Table of Contents
Setting up a Rust development environment on Windows has never been easier. In this comprehensive guide, we will show you how to install Rust on Windows, configure the best Rust IDE, and start building projects quickly and efficiently.
Whether you’re a beginner or an experienced developer, this Rust setup guide for Windows will get you coding in minutes.
🛠️ Installing Rust on Windows
To begin building your Rust development environment on Windows, you first need to install Rust.
The easiest and official method is by using rustup, Rust’s installer and version management tool.
Steps to Install Rust on Windows:
- Open PowerShell as Administrator.
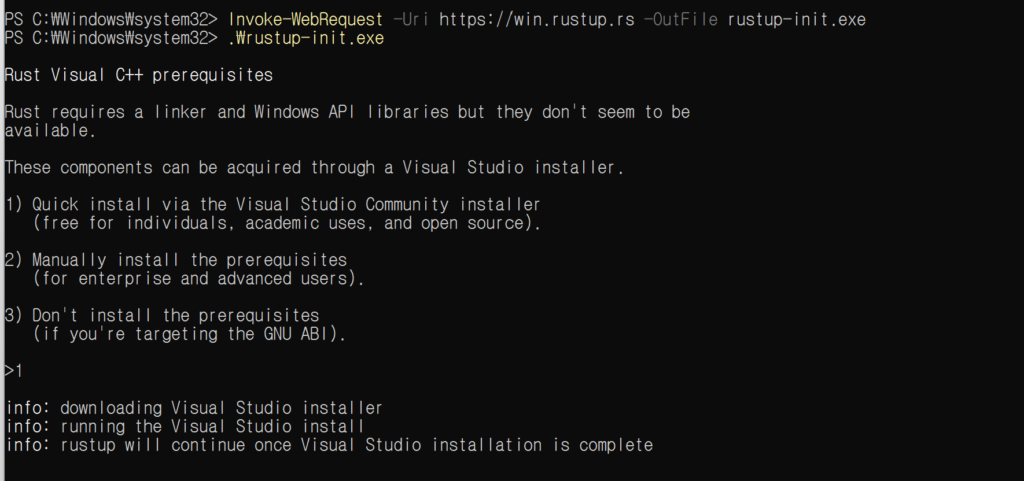
- Run the following command to download and install rustup: powershell
Invoke-WebRequest -Uri https://win.rustup.rs -OutFile rustup-init.exe .\rustup-init.exe
- Follow the prompts and select the default installation.
After completing the setup, verify the installation:
rustc --version
cargo --version
✅ Congratulations! Your basic Rust setup on Windows is complete.
🛠️ Configuring Your Rust IDE for Windows
Choosing the right IDE greatly enhances your experience when working in a Rust development environment on Windows.
Recommended Rust IDEs for Windows:
- Visual Studio Code (VS Code)
- VSCodium (for a fully open-source alternative)
Essential Extensions:
- rust-analyzer: Fast auto-completion, real-time error checking, and advanced navigation features.
- CodeLLDB: For powerful debugging of Rust applications.
💡 Tip: rust-analyzer installation is highly recommended for faster development and better code analysis.
🛠️ Creating Your First Rust Project on Windows
Now that your Rust development environment on Windows is ready, it’s time to create your first project.
Open a terminal and run:
cargo new hello_rust
cd hello_rust
cargo run
cargo newcreates a new Rust project.cargo runcompiles and runs the project immediately.
✅ If you see Hello, world!, you’ve successfully created and run a Rust project on Windows!
This simple step shows how easy it is to run Rust programs on Windows.
🛠️ (Optional) Installing C++ Build Tools for Native Libraries
Some advanced Rust crates (like openssl) require native C/C++ code compilation.
To avoid errors, install the Microsoft Visual C++ Build Tools:
- Download from Visual Studio Build Tools
- Select the C++ build tools option during installation.
This ensures smooth compiling even when working with complex native dependencies.
🛠️ Keeping Rust Updated on Windows
Maintaining your Rust development environment on Windows up-to-date is simple.
- Update Rust: bash복사편집
rustup update - If necessary, uninstall and reinstall: bash복사편집
rustup self uninstall
Regular updates ensure you have the latest features, security patches, and performance improvements.
📈 Final Thoughts: Why Set Up a Rust Development Environment on Windows?
Setting up a Rust development environment on Windows provides you with a powerful, safe, and high-performance programming setup. With tools like Cargo, rust-analyzer, and VS Code, you can enjoy a smooth workflow whether you’re building system software, web applications, or even AI projects.
Whether you are installing Rust for the first time or updating your existing environment, Windows offers a robust platform for modern Rust development.
✅ Quick Setup Checklist
| Step | Description |
|---|---|
| Install Rust | Using rustup on Windows |
| Install IDE | VS Code or VSCodium |
| Install Extensions | rust-analyzer and CodeLLDB |
| Create a Project | cargo new project_name |
| Run the Project | cargo run |
| Update Rust | rustup update |
📚 Rust Development Environment on Windows — 12 Detailed FAQs
1. Is Rust free to install and use on Windows?
✅ Answer:
Yes, Rust is completely free and open-source.
Rust is developed under the MIT and Apache 2.0 licenses, allowing anyone to install, use, modify, and distribute it without cost.
You can safely set up a Rust development environment on Windows without any licensing fees or restrictions.
2. How do I install Rust on Windows?
✅ Answer:
To install Rust on Windows, use the official rustup installer.
Open PowerShell (as administrator) and run:
powershell복사편집Invoke-WebRequest -Uri https://win.rustup.rs -OutFile rustup-init.exe
.\rustup-init.exe
Follow the prompts to complete the Rust setup on Windows.
This will install rustc, cargo, and rustup.
3. What is rustup and why is it important?
✅ Answer:rustup is Rust’s official installer and version manager.
It allows you to easily install Rust, switch between stable, beta, and nightly toolchains, and keep your Rust development environment on Windows up to date with simple commands like rustup update.
4. How do I verify Rust installation on Windows?
✅ Answer:
After installing Rust, open a terminal and type:
bash복사편집rustc --version
cargo --version
If version numbers appear, your Rust installation on Windows is successful.
5. Which IDE is best for Rust development on Windows?
✅ Answer:
Visual Studio Code (VS Code) is highly recommended for building a Rust development environment on Windows.
For an open-source alternative, VSCodium is a great choice.
Installing the rust-analyzer and CodeLLDB extensions will give you full IntelliSense, code navigation, and debugging capabilities.
6. Do I need to install rust-analyzer?
✅ Answer:
Absolutely.rust-analyzer offers fast code completion, inline error checking, go-to-definition, and advanced refactoring tools.
Installing rust-analyzer ensures a smooth experience when working in your Rust IDE for Windows.
7. How do I create a new Rust project on Windows?
✅ Answer:
Use Cargo to create a new project easily:
bash복사편집cargo new project_name
cd project_name
cargo run
The cargo new command scaffolds a basic Rust project, helping you quickly start coding in your Rust development environment on Windows.
8. How do I run Rust programs on Windows?
✅ Answer:
Navigate to your project folder and use:
bash복사편집cargo run
This command compiles and runs your project.
Running Rust programs on Windows is seamless once your environment is set up correctly.
9. Do I need Visual Studio C++ Build Tools for Rust?
✅ Answer:
For basic Rust projects, you don’t need them.
However, if your project uses crates that require native C libraries (e.g., openssl, ring), you must install Visual Studio C++ Build Tools.
This ensures proper compilation and linking of native code on Windows.
10. How do I update Rust on Windows?
✅ Answer:
Updating Rust is very simple:
bash복사편집rustup update
This keeps your Rust development environment on Windows current with the latest features, bug fixes, and security patches.
11. How do I uninstall Rust on Windows?
✅ Answer:
If you need to uninstall Rust completely:
bash복사편집rustup self uninstall
This command removes all Rust components cleanly from your Windows system.
12. Can I install multiple Rust versions on Windows?
✅ Answer:
Yes!
Thanks to rustup, you can install and manage multiple Rust versions (stable, beta, nightly) simultaneously.
Use:
bash복사편집rustup install nightly
rustup default nightly
This feature makes it easy to test new language features without affecting your stable Rust development environment on Windows.
Visual Studio Code is a fantastic editor that many developers love. However, if you’ve ever wished for a version that’s fully open-source and doesn’t include telemetry, you might want to check out VSCodium. It’s essentially the same editor underneath but without Microsoft’s branding, licensing layers, or background data collection.
The differences between VS Code and VSCodium aren’t huge in daily usage, but they matter if you care about open-source purity or privacy.
VS Code includes telemetry by default and connects directly to Microsoft’s extension marketplace, making it super convenient out of the box.
VSCodium, on the other hand, strips all that away—no telemetry, no Microsoft-specific modifications. It requires a tiny bit more setup for extensions but gives you a cleaner, fully open-source experience.
If that sounds appealing, let’s walk through how you can set up Rust development on Windows using VSCodium.
Installing VSCodium is straightforward.
Head over to the official website https://vscodium.com/ and grab the User Installer for Windows.
The User Installer is important because it keeps VSCodium separate from your existing VS Code installation, avoiding any conflicts.
Once the installer downloads, launch it, and simply go through the setup. When you see the option to set VSCodium as your default editor, you might want to leave it unchecked if you’re still actively using VS Code as your primary editor.
After installation, VSCodium will sit neatly alongside VS Code on your system, and you can open either editor whenever you want.
Since VSCodium doesn’t connect to Microsoft’s extension marketplace by default, there’s a tiny tweak needed before setting up your Rust environment.
Open VSCodium, go to:
File → Preferences → Settings- Click the
{}icon to opensettings.json - Add the following block:
json복사편집{
  "extensions.gallery": {
    "serviceUrl": "https://marketplace.visualstudio.com/_apis/public/gallery",
    "itemUrl": "https://marketplace.visualstudio.com/items",
    "controlUrl": "",
    "cacheUrl": "https://vscode.blob.core.windows.net/gallery/index",
    "itemDetailUrl": "https://marketplace.visualstudio.com/items"
  }
}
Save the file and restart VSCodium.
Now you’ll have full access to the Microsoft extension marketplace, just like in regular VS Code.
With that set up, it’s time to install the Rust essentials.
Open the Extensions panel (Ctrl + Shift + X), then search and install:
- rust-analyzer: for powerful Rust language support like IntelliSense, code navigation, and error checking.
- CodeLLDB: for debugging Rust programs.
These two extensions turn VSCodium into a full-fledged Rust IDE.
To actually run Rust programs, you’ll need to install Rust itself.
Open a terminal (PowerShell or CMD) and run:
bash복사편집Invoke-WebRequest -Uri https://win.rustup.rs -OutFile rustup-init.exe
.\rustup-init.exe
Follow the prompts and select the default installation option.
This installs rustc (the compiler), cargo (the build system and package manager), and rustup (the version manager).
After installation, verify everything is ready:
bash복사편집rustc --version
cargo --version
If you see version numbers, you’re good to go.
Now let’s create your first Rust project right inside VSCodium.
Open the integrated terminal (Ctrl + ~) and type:
bash복사편집cargo new hello_vscodium
cd hello_vscodium
cargo run
You should see:
복사편집Hello, world!
Congratulations—you’ve now set up a Rust development environment on Windows using VSCodium, fully open-source, privacy-respecting, and ready to build amazing projects.
By using VSCodium for Rust development, you get the comfort and familiarity of VS Code while sticking closer to open-source principles.
It’s a small change that can make a big difference, especially if you care about transparency and privacy in your tools.