Table of Contents
1. Rust text-based 2D game tutorial: Setting Up Your Game World
Before we dive in, we recommend checking out this article on building a dynamic map system in Rust to get a solid foundation.
Welcome to the beginning of our Rust text-based 2D game tutorial!
If you’ve ever dreamed of building your own retro-style RPG — something in the spirit of Ultima I, Rogue, or NetHack — you’re in the right place.
In this tutorial series, we’ll walk you through building a complete 2D text-based game in Rust — from scratch — using no external game engines, just raw logic and creativity.
In this first section, we’ll focus on one critical foundation:
building the game world.
Instead of sophisticated 3D graphics or complex engines, we’ll use a good old-fashioned 2D array — a simple grid of characters — to represent everything.
This approach mirrors how many early RPGs managed complex worlds with limited resources, and it’s a great way to practice core programming skills like data structures, loops, and logic.
🧩 Our Game World Basics:
Each tile in our game map will be a character (char), and different characters will represent different types of terrain or entities:
.→ Empty floor tile#→ Wall*→ Item (e.g., treasure or potion)M→ Monster (enemy you can fight)@→ The player (you!)
The world itself will be a 2D vector in Rust (Vec<Vec<char>>), where each element can be individually accessed and updated.
For now, we’ll start simple:
- A 20×10 grid (width 20, height 10).
- The entire map will be initialized as empty floor (
.). - The player will be placed at a starting position, such as (1,1).
Later, we’ll expand the world to include walls, monsters, items, and more.
But for now, just getting a map on the screen that you can actually see and interact with is our first milestone.
🚀 What We’ll Achieve by the End of This Section:
- Create and initialize a basic 2D game world.
- Place the player character on the map.
- Display the world on the terminal.
- Prepare the groundwork for movement, combat, and exploration mechanics.
By the end of this step, you’ll have a simple world that feels alive — even if it’s just dots and symbols for now.
Remember: every great game starts with a humble beginning!
Let’s dive in and build our first version of the map!
2. Rust text-based 2D game tutorial: Handling Player Movement
Now that we have a basic world set up, it’s time to bring it to life by letting the player move around.
In this part of the Rust text-based 2D game tutorial, we’ll add input handling and basic player movement across the map.
Without movement, a game world is static — it’s just a painting, not an experience.
By allowing the player to move around, explore, and interact, we’re transforming our grid into something much more dynamic and immersive.
🎮 How Movement Will Work
We’ll use simple text input to control the player.
Players will type one of four keys:
w→ move up (north)s→ move down (south)a→ move left (west)d→ move right (east)
After each move, the game will re-render the map so the player can see the updated position.
To make this happen, we need to:
- Capture keyboard input from the user.
- Update the player’s position based on the input.
- Ensure the player doesn’t move outside the map boundaries.
- Refresh the map display to reflect the new state.
🛠️ Step-by-Step Plan
1. Capture user input:
We’ll use Rust’s std::io::stdin() to read the player’s command each turn.
After getting the input, we trim it and match it against possible moves.
2. Update the map:
Before moving, we’ll clear the player’s previous position (set it back to a floor tile .).
After moving, we’ll place the player symbol @ at the new position.
3. Boundary checking:
We must ensure the player can’t move outside the map edges (no teleporting off the grid!).
If the player tries to move past the boundary, we’ll simply block the move and optionally print a warning like:
“You cannot move there!”
4. Redraw the world:
After every move — valid or invalid — the entire map will be printed again so the player always knows where they are.
📜 What the Code Will Look Like
Here’s a sneak peek of what our movement code will involve:
// (simplified idea)
match input {
    "w" if player_y > 0 => player_y -= 1,
    "s" if player_y < HEIGHT - 1 => player_y += 1,
    "a" if player_x > 0 => player_x -= 1,
    "d" if player_x < WIDTH - 1 => player_x += 1,
    _ => println!("You can't move that way!"),
}
Pretty simple — but when combined with map updating and redrawing, it creates the feeling of real movement through the world.
🚀 What We Will Achieve by the End of This Section:
- Allow the player to move freely across the floor tiles.
- Block invalid moves outside the boundaries.
- Continuously refresh the terminal view of the world after each input.
- Set up the foundation for interacting with monsters, walls, and items in the next steps!
With basic movement in place, our game will finally feel alive.
Soon, the player won’t just be wandering an empty map — monsters will spawn, treasures will await, and real adventures will begin!
Ready to start coding player movement?
Let’s dive into the next part of our Rust text-based 2D game tutorial!
3. Rust text-based 2D game tutorial: Creating Walls and Boundaries
Now that the player can move freely around the map, it’s time to make the world feel a bit more realistic — and a lot more interesting.
In this part of the Rust text-based 2D game tutorial, we’ll introduce walls to the game world and implement collision detection to prevent players from walking through solid objects.
Without walls, exploration has no meaning — it’s just endless open space.
Walls give structure to our world, create challenges for navigation, and lay the foundation for designing dungeons, cities, and landscapes.
🧱 What Are Walls in a Text-based 2D Game?
In our text-based map, a wall will simply be another character: #.
- Floor tile →
. - Wall tile →
# - Player →
@ - Other features (monsters
M, items*) will come soon.
Walls are impassable. If a player tries to move into a wall, the game will block the move and inform them.
🛠️ How We’ll Build It
1. Add walls to the map:
When we initialize the map, we’ll insert some # tiles manually to form a basic structure, like borders or simple obstacles.
2. Modify movement logic:
Before allowing the player to move, we’ll check if the destination tile is a wall.
If it is, the move will be canceled.
3. Improve user feedback:
If the player tries to walk into a wall, we’ll display a simple message like:
“You bump into a wall!”
🧩 Example: Adding Walls
When setting up the map, we can manually create a border of walls around the edges:
// Set top and bottom borders
for x in 0..WIDTH {
    map[0][x] = '#';
    map[HEIGHT - 1][x] = '#';
}

// Set left and right borders
for y in 0..HEIGHT {
    map[y][0] = '#';
    map[y][WIDTH - 1] = '#';
}
This way, the outer frame of the map will be made of solid walls.
We can also sprinkle a few random walls inside the map manually or programmatically later,
to create small mazes or obstacles.
🧩 Example: Checking for Wall Collisions
Before updating the player’s position, we need to check the destination tile:
let (new_x, new_y) = match input {
    "w" => (player_x, player_y.saturating_sub(1)),
    "s" => (player_x, player_y + 1),
    "a" => (player_x.saturating_sub(1), player_y),
    "d" => (player_x + 1, player_y),
    _ => {
        println!("Invalid input!");
        (player_x, player_y)
    }
};

// Only move if the destination is not a wall
if map[new_y][new_x] != '#' {
    map[player_y][player_x] = '.';
    player_x = new_x;
    player_y = new_y;
    map[player_y][player_x] = '@';
} else {
    println!("You bump into a wall!");
}
Notice how we:
- Calculate the potential new position first.
- Check if the tile at
(new_x, new_y)is a wall. - Only move if it’s not a wall.
This simple logic prevents the player from walking through walls and makes navigation more meaningful.
🚀 What We Will Achieve by the End of This Section:
- Add physical boundaries to the game world.
- Make the player respect environmental obstacles.
- Start designing simple level layouts.
- Set up the future possibility of locked doors, destructible walls, secret passages, and more!
With walls in place, the world feels more alive and tactical.
Movement becomes more strategic — you can’t just wander anywhere anymore.
The player must think, navigate, and find paths through the obstacles.
Walls are just the beginning of shaping a truly adventurous world.
Up next, we’ll make the world even more exciting by adding items to collect and monsters to fight!
4. Rust text-based 2D game tutorial: Adding Items and Monsters
Now that we have a world the player can explore — complete with solid walls and open floors — it’s time to breathe even more life into it.
In this part of the Rust text-based 2D game tutorial, we’ll add items for the player to collect and monsters to encounter.
A world without rewards or risks is boring.
Items give players a reason to explore, and monsters give players a reason to be cautious.
By adding both, we turn our simple grid into a real adventure!
🎮 What Are Items and Monsters in Our Game?
We’ll represent them with different characters:
*→ An item (like a potion, treasure, or equipment)M→ A monster (enemy that can harm the player)
Both items and monsters will be randomly placed on the map at the start of the game.
When the player moves onto a tile containing an item or monster, something special will happen.
🛠️ How We’ll Implement It
1. Spawning items and monsters:
We’ll randomly pick empty floor tiles (.) and place a * or an M there during map setup.
2. Detecting interactions:
When the player moves, we’ll check what’s on the destination tile.
- If it’s an item (
*), the player picks it up. - If it’s a monster (
M), a simple battle happens.
3. Updating the map:
After picking up an item or defeating a monster, the tile will revert back to a floor tile (.).
🧩 Example: Randomly Placing Items and Monsters
When creating the map, after walls are placed:
use rand::Rng;

let mut rng = rand::thread_rng();

// Place 5 items
for _ in 0..5 {
    loop {
        let x = rng.gen_range(1..WIDTH-1);
        let y = rng.gen_range(1..HEIGHT-1);
        if map[y][x] == '.' {
            map[y][x] = '*';
            break;
        }
    }
}

// Place 3 monsters
for _ in 0..3 {
    loop {
        let x = rng.gen_range(1..WIDTH-1);
        let y = rng.gen_range(1..HEIGHT-1);
        if map[y][x] == '.' {
            map[y][x] = 'M';
            break;
        }
    }
}
This will randomly scatter five items and three monsters around the world.
🧩 Example: Handling Interactions During Movement
When the player moves, after deciding on the destination tile:
match map[new_y][new_x] {
    '*' => {
        println!("You found an item!");
        map[new_y][new_x] = '.';
    },
    'M' => {
        println!("A monster attacks you!");
        // (We’ll add a simple combat system in the next section.)
        map[new_y][new_x] = '.';
    },
    '#' => {
        println!("You bump into a wall!");
        return; // Cancel the move
    },
    _ => {
        // Move normally
    }
}
Notice how:
- Items are immediately collected (and disappear from the map).
- Monsters trigger an encounter (and also disappear for now — until we make real combat).
Later, we’ll expand the monster encounter into real battles with HP loss!
🚀 What We Will Achieve by the End of This Section:
- Scatter collectibles across the world.
- Introduce dangers that can hurt the player.
- Make exploration more rewarding and risky.
- Lay the groundwork for a real battle system.
Now, the world isn’t just something to move through — it’s something to interact with.
The player has reasons to go places: rewards to earn, dangers to avoid, and challenges to overcome.
Our Rust text-based 2D game tutorial is quickly turning into a real mini-RPG!
Next, we’ll focus on turning those monster encounters into meaningful battles that test the player’s strength.
5. Rust text-based 2D game tutorial: Building a Simple Combat System
Up until now in our Rust text-based 2D game tutorial, encountering a monster simply triggered a message and the monster disappeared.
But that’s not very exciting, is it?
In this section, we’re going to add a basic combat system to our game.
The player will have health points (HP), and fighting monsters will reduce those HP.
If the player’s HP drops to zero, it’s game over!
Introducing combat is crucial because it brings real stakes into the game.
Players must think carefully about where they go and whether they are ready to face dangers ahead.
🛡️ How Our Combat System Will Work
At this stage, we’ll keep the combat simple:
- Player HP: The player starts with a certain amount of health, such as 10 HP.
- Monster attack: When encountering a monster, the player takes a fixed amount of damage (e.g., 2 HP).
- Monster disappears after battle: For now, battles will be automatic and quick.
- Game Over: If HP reaches 0, the game ends immediately.
Later, you can expand this into more complex systems with attack rolls, defense stats, special abilities, and more — but for now, simplicity is key.
🛠️ Implementing the Combat System
1. Track Player HP:
We’ll introduce a player_hp variable at the start of the game.
2. Update Monster Encounters:
Instead of just printing “A monster attacks!”, we’ll subtract health points.
3. Check for Defeat:
After taking damage, if HP is 0 or less, we’ll end the game and print a defeat message.
🧩 Example: Tracking Player HP
At the start of your main() function:
rust복사편집let mut player_hp = 10;
🧩 Example: Handling Combat
During movement/interaction:
rust복사편집match map[new_y][new_x] {
    '*' => {
        println!("You found an item!");
        map[new_y][new_x] = '.';
    },
    'M' => {
        println!("A monster attacks you!");
        player_hp -= 2;
        println!("You took 2 damage! Current HP: {}", player_hp);
        map[new_y][new_x] = '.';
        if player_hp <= 0 {
            println!("You have been defeated by the monsters...");
            println!("Game Over!");
            return;
        }
    },
    '#' => {
        println!("You bump into a wall!");
        return;
    },
    _ => {
        // Move normally
    }
}
Now, every time the player bumps into a monster:
- They lose 2 HP.
- They are notified of the damage and their remaining HP.
- If HP hits zero, the game ends immediately.
🧠 Optional: Healing with Items
We can make the game a little more forgiving by allowing items (*) to restore some HP:
'*' => {
    println!("You found a healing potion!");
    player_hp += 2;
    if player_hp > 10 { player_hp = 10; } // Max HP cap
    println!("You recovered 2 HP! Current HP: {}", player_hp);
    map[new_y][new_x] = '.';
}
This makes exploration more strategic:
- Should I risk fighting that monster?
- Or should I hunt for items first to heal up?
🚀 What We Will Achieve by the End of This Section:
- Make monster encounters meaningful and dangerous.
- Introduce resource management (player HP).
- Allow for player defeat (game over condition).
- Deepen player decision-making during exploration.
With combat in place, the world feels truly alive — and deadly.
Now, every step the player takes is a decision between life and death.
And that’s exactly what makes a real RPG thrilling!
Our Rust text-based 2D game tutorial is almost ready to add the final layers:
victory conditions, new features, and polish.
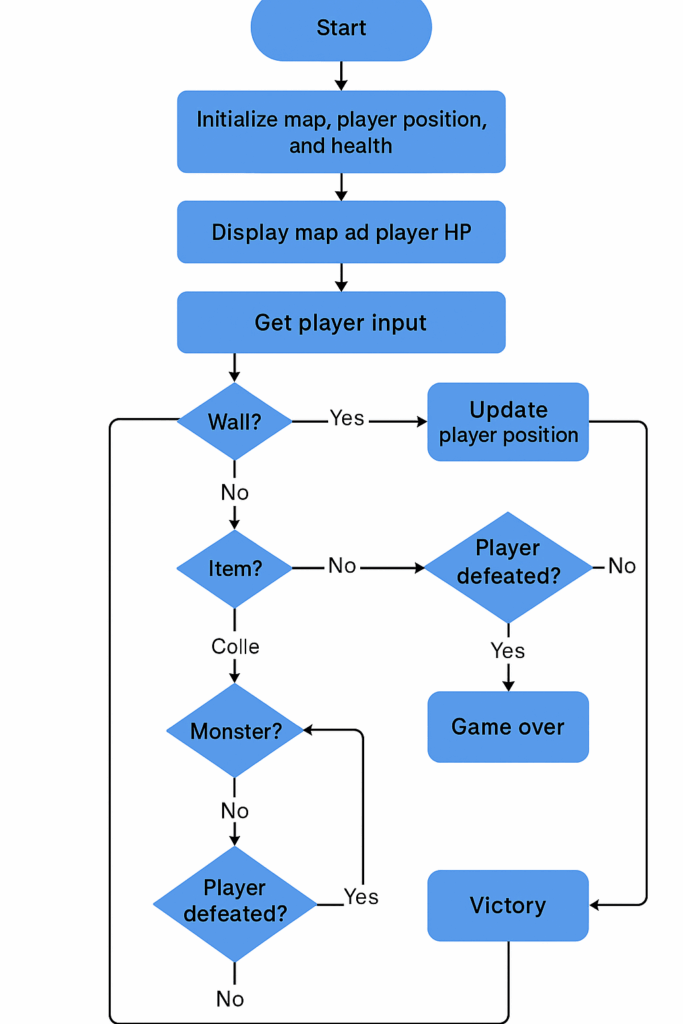
6. Rust text-based 2D game tutorial: Defining Victory and Defeat Conditions
Now that we have movement, walls, items, monsters, and combat,
our game finally feels alive — but how does it end?
Without a clear goal, the player could wander forever without any sense of completion.
In this part of the Rust text-based 2D game tutorial,
we will define victory and defeat conditions —
rules that determine when the game is won or lost.
Clear goals make the gameplay satisfying.
Players need a reason to explore, fight, and survive —
and they deserve a moment of triumph when they succeed!
🎯 How Our Win/Loss System Will Work
Victory Condition:
- The player wins by collecting all items (
*) on the map.
Defeat Condition:
- The player loses if their HP drops to zero or below after fighting monsters.
We already handled defeat in the previous section.
Now we’ll implement victory checking after every move!
🛠️ Implementing Victory Conditions
1. Track Remaining Items:
We’ll count the number of items left on the map after each move.
2. Check for Victory:
If there are no more * symbols left on the map, the player wins!
🧩 Example: Checking for Victory After Each Move
After processing player movement and interactions:
// Count remaining items
let mut items_left = 0;
for row in &map {
    for &tile in row {
        if tile == '*' {
            items_left += 1;
        }
    }
}

if items_left == 0 {
    println!("You have collected all the treasures!");
    println!("Victory is yours! Congratulations!");
    return;
}
Very simple:
- Loop through every tile in the map.
- If no
*remains, the player has won.
We can place this check at the end of the movement turn,
right after redrawing the map and handling combat.
🧠 Optional Enhancements
To make the endgame feel even more satisfying, you could:
- Play a victory animation (like printing stars ✨ across the terminal).
- Display the number of moves it took to win.
- Add a “Play Again?” prompt to restart the game without exiting.
But for now, a clear “Victory!” message is more than enough!
🚀 What We Will Achieve by the End of This Section:
- Give players a clear goal: collect all items.
- Provide a satisfying victory moment.
- Complete the basic game loop from start to finish.
- Turn our simple 2D world into a real game with stakes and rewards.
At this point, our game finally has all the essential elements:
- Movement
- Obstacles
- Combat
- Resource Management
- Clear Goals
Our Rust text-based 2D game tutorial has taken us from an empty grid
to a fully functional miniature RPG adventure — all using nothing but plain text and pure Rust!
7. Rust text-based 2D game tutorial: Expanding Your Game with New Features
Congratulations — if you’ve followed along so far, you’ve built a fully playable Rust text-based 2D game!
But why stop here?
In this final part of the Rust text-based 2D game tutorial, we’ll explore how to expand and enrich your game with new features.
These ideas can turn your simple prototype into a much deeper, more exciting adventure — maybe even the start of your own mini Ultima or NetHack clone!
🌟 Ideas for Expanding Your Game
Here are some powerful and achievable upgrades you can add:
🧙♂️ 1. Add Experience Points (XP) and Leveling Up
Right now, fighting monsters just reduces your HP.
Let’s make it rewarding by giving the player XP for each defeated monster.
- Defeating a monster → Gain XP
- After earning enough XP → Level up → Restore HP or increase stats
You could even show messages like:
“You leveled up! Your max HP increased!”
This gives players a strong sense of progression as they survive longer.
🧪 2. Introduce Different Types of Monsters
Not all monsters have to be the same.
You can easily create variety by introducing:
- Weak monsters (deal less damage)
- Strong monsters (deal more damage)
- Boss monsters (maybe even requiring multiple hits to defeat)
Use different letters (M, B, D for dragon?) to represent them!
Each monster type could have:
- Different damage
- Different rewards (XP, items)
🔥 3. Add Magic and Special Abilities
Give the player new powers!
For example:
- Fireball spell: Defeat a monster from a distance
- Heal spell: Restore your HP during combat
Spells could cost a new resource like mana points (MP),
adding another layer of decision-making and resource management.
🛒 4. Create Shops and Gold Economy
Scatter gold coins on the map alongside monsters and items.
Later, players can find shops where they can:
- Buy healing potions
- Buy better armor
- Buy spell scrolls
You could even represent shops with a special tile like $ on the map!
🗺️ 5. Build Multiple Maps or Dungeons
Right now you only have a single 20×10 map.
But you can create multiple maps, representing different floors of a dungeon or areas of a kingdom.
After collecting all items or defeating all monsters on a map,
the player could “descend” to the next level, each harder than the last.
Each level could have:
- More monsters
- Fewer items
- More complex mazes
🧠 6. Implement Save and Load System
Saving the player’s progress would make the game feel more real and professional.
You can serialize game state (player position, HP, map layout) to a simple text file.
Later, the player can load their adventure and continue where they left off!
🚀 What You Will Learn by Expanding Your Game
By attempting any of these expansions, you’ll practice and master important Rust and game development skills:
- Data management (tracking HP, XP, inventory)
- Random generation (for monsters, items, levels)
- State machines (handling different game states like shops, combat, menus)
- File I/O (saving and loading game progress)
- Strategic game design (balancing difficulty and reward)
You’ll also improve your ability to think like a real game developer —
breaking down big ideas into manageable, fun features.
🎯 Final Thought
You started with a simple 2D map.
Now you have the tools to build an entire world.
This project might have begun as a basic Rust text-based 2D game tutorial,
but it can easily grow into your first complete RPG,
handcrafted by you, powered by the safety and speed of Rust.
The adventure is only just beginning. 🌟
Now, it’s your turn to expand, create, and imagine!
Good luck, adventurer! 🛡️⚔️
🧩 Rust Text-based 2D Game: Full Version (English Comments)
use std::io;
use rand::Rng;

// Map size
const WIDTH: usize = 20;
const HEIGHT: usize = 10;

fn main() {
    // Initialize the map filled with floor tiles
    let mut map = vec![vec!['.'; WIDTH]; HEIGHT];
    let mut rng = rand::thread_rng();

    // Player's starting position and health
    let mut player_x = 1;
    let mut player_y = 1;
    let mut player_hp = 10;

    // Create wall borders
    for x in 0..WIDTH {
        map[0][x] = '#';
        map[HEIGHT - 1][x] = '#';
    }
    for y in 0..HEIGHT {
        map[y][0] = '#';
        map[y][WIDTH - 1] = '#';
    }

    // Randomly place items
    for _ in 0..5 {
        loop {
            let x = rng.gen_range(1..WIDTH - 1);
            let y = rng.gen_range(1..HEIGHT - 1);
            if map[y][x] == '.' {
                map[y][x] = '*';
                break;
            }
        }
    }

    // Randomly place monsters
    for _ in 0..3 {
        loop {
            let x = rng.gen_range(1..WIDTH - 1);
            let y = rng.gen_range(1..HEIGHT - 1);
            if map[y][x] == '.' {
                map[y][x] = 'M';
                break;
            }
        }
    }

    // Place the player on the map
    map[player_y][player_x] = '@';

    loop {
        print_map(&map, player_hp);

        println!("Move (w/a/s/d): ");
        let mut input = String::new();
        io::stdin().read_line(&mut input).unwrap();
        let input = input.trim();

        let (mut new_x, mut new_y) = (player_x, player_y);

        // Determine new position based on input
        match input {
            "w" => new_y = player_y.saturating_sub(1),
            "s" => new_y = player_y + 1,
            "a" => new_x = player_x.saturating_sub(1),
            "d" => new_x = player_x + 1,
            _ => {
                println!("Invalid input!");
                continue;
            }
        }

        // Check for wall collision
        if map[new_y][new_x] == '#' {
            println!("You bump into a wall!");
            continue;
        }

        // Handle interactions based on destination tile
        match map[new_y][new_x] {
            '*' => {
                println!("You found a healing potion!");
                player_hp += 2;
                if player_hp > 10 {
                    player_hp = 10;
                }
                println!("You recovered 2 HP! Current HP: {}", player_hp);
            }
            'M' => {
                println!("A monster attacks you!");
                player_hp = player_hp.saturating_sub(2);
                println!("You took 2 damage! Current HP: {}", player_hp);
                if player_hp == 0 {
                    println!("You have been defeated by the monsters...");
                    println!("Game Over!");
                    return;
                }
            }
            _ => {}
        }

        // Update the map with the player's new position
        map[player_y][player_x] = '.';
        player_x = new_x;
        player_y = new_y;
        map[player_y][player_x] = '@';

        // Check for victory condition (no items left)
        let mut items_left = 0;
        for row in &map {
            for &tile in row {
                if tile == '*' {
                    items_left += 1;
                }
            }
        }

        if items_left == 0 {
            println!("You have collected all the treasures!");
            println!("Victory is yours! Congratulations!");
            return;
        }
    }
}

// Function to print the current state of the map and player HP
fn print_map(map: &Vec<Vec<char>>, player_hp: usize) {
    println!();
    println!("Player HP: {}", player_hp);
    for row in map {
        for &cell in row {
            print!("{}", cell);
        }
        println!();
    }
    println!();
}
🦀 Rust Programming & Game Dev Resources
- Rust Official Website
The home of the Rust programming language. Great for documentation, installation guides, and learning materials.
🔗 https://www.rust-lang.org/ - Rust Playground
A browser-based IDE to write and run Rust code instantly — great for small experiments and sharing code.
🔗 https://play.rust-lang.org/ randCrate Documentation
Official documentation for therandcrate, used to generate random numbers in Rust.
🔗 https://docs.rs/rand- Hands-on Rust (Book)
A highly recommended book that teaches Rust through game development, including dungeon crawlers.
🔗 https://pragprog.com/titles/hwrust/hands-on-rust/ - Make a Text Adventure Game in Rust
A multi-part tutorial series on building a text-based game from scratch in Rust.
🔗 https://www.riskpeep.com/2022/08/make-text-adventure-game-rust-1.html
🎨 Retro / ASCII Art Resources
- ASCII Art Archive
A massive and well-organized collection of ASCII art in various categories — great for old-school vibes.
🔗 https://www.asciiart.eu/ - 16colo.rs ANSI/ASCII Art Archive
Preserving the legacy of ANSI and ASCII art from the BBS era — inspiring for game aesthetics.
🔗 https://16colo.rs/ - ASCII Art Website
Curated collections of hand-drawn ASCII art in a variety of styles and subjects.
🔗 https://asciiart.website/ - Wikipedia: ASCII Art
A great primer on the history and significance of ASCII art in digital culture.
🔗 https://en.wikipedia.org/wiki/ASCII_art