Table of Contents
Enhanced Session Mode in Hyper‑V provides tight integration between a Windows host and a Linux guest VM. It allows features like shared clipboard (copy/paste), dynamic desktop resizing, shared drives, and improved performance in the Ubuntu VM (Composite Thrashing Code Adron’s success in misadventures of thrashing coding and calamity! Ubuntu on Hyper-V, Insuring Enhanced Session Works).
By default, Ubuntu does not support Hyper‑V’s enhanced mode out of the box, so we need to install and configure additional tools. This step-by-step guide (updated for 2025) will walk you through enabling Enhanced Session Mode on an Ubuntu VM in Hyper‑V, including the latest compatibility fixes for newer Ubuntu versions (e.g. handling Wayland and updated Hyper-V socket support). We will use Microsoft’s linux-vm-tools scripts (now community-maintained, since the official project was archived after Ubuntu 18.04 (Can’t enable Enhanced Sessions? : r/HyperV)) to set up the necessary components on Ubuntu.
Note: This guide assumes you have already installed Ubuntu Desktop in a Generation 2 Hyper-V VM. Ensure you did not enable automatic login for your Ubuntu user during setup – auto-login can prevent XRDP (the Enhanced Session backend) from working properly (Onboarding: Ubuntu · microsoft/linux-vm-tools Wiki · GitHub). Also, make sure your Hyper-V host is running Windows 10 build 1803 or later (or Windows 11) so that Enhanced Session features are supported.
Note2: If you run into an error while using Quick Create, check out this guide on fixing Hyper-V error 0x80131040. It provides step-by-step solutions to help you resolve the issue quickly. Following the instructions, you should be able to get Quick Create working again in no time. Don’t let this error slow you down—give the guide a read! 😊
1. Enable Enhanced Session Mode on the Hyper-V Host
Before configuring Ubuntu, verify that Enhanced Session Mode is allowed on the host and for your VM:
- Allow Enhanced Session Mode in Hyper-V Settings: On the Windows host, open Hyper-V Manager. Right-click your host name and go to Ubuntu VM Settings. Under Enhanced Session Mode Policy, check “Allow enhanced session mode”. Also, under your user settings, ensure “Use enhanced session mode” is enabled (Composite Thrashing Code Adron’s success in misadventures of thrashing coding and calamity! Ubuntu on Hyper-V, Insuring Enhanced Session Works). This ensures the host is permitted to offer enhanced sessions.
- Enable Guest Integration Services: In the settings for your Ubuntu VM (in Ubuntu VM Manager, under Integration Services or Integration Features), make sure all services (Guest Service Interface, Clipboard, etc.) are turned on ( Ubuntu VM with Enhanced Session Hyper-V with Sound ). This will allow the VM to use integration features like copy/paste and drive redirection.
2. Prepare the Ubuntu Guest VM
Start your Ubuntu VM normally (basic session mode) to install the necessary tools.
Update System and Install Git
Open a terminal and run the following commands to update your package list, upgrade installed packages, and install Git (needed to clone the tools repository):
sudo apt update && sudo apt upgrade -y
sudo apt install -y git
This ensures your system is up to date and has Git installed.
If prompted, reboot the VM before proceeding:
sudo reboot
Disable Wayland (if applicable)
Ubuntu 22.04+ may use Wayland by default for the login screen.
Since Wayland can cause black screens or failed logins in Hyper-V Enhanced Mode, ensure that your system uses Xorg instead.
To disable Wayland, open the configuration file in a text editor:
sudo nano /etc/gdm3/custom.conf
Find this line:
#WaylandEnable=false
Uncomment it by removing the #, so it looks like this:
WaylandEnable=false
Save the file and exit (Ctrl + X, then Y, then Enter).
Now, reboot your VM to apply the changes:
sudo reboot

3. Download the Hyper-V Linux VM Tools
Next, download the Hyper-V integration scripts to configure Ubuntu for enhanced session mode.
In the Ubuntu terminal, clone the Hinara/linux-vm-tools repository from GitHub, which contains updated scripts for Ubuntu 20.04, 22.04, and 24.04:
git clone https://github.com/Hinara/linux-vm-tools
cd linux-vm-tools
Now, find and enter the directory that matches the installed Ubuntu version.
For Ubuntu 24.04, navigate to:
cd ubuntu/24.04
If you are using a different version, adjust the directory accordingly (e.g., ubuntu/22.04 for Ubuntu 22.04).
이제 네가 직접 사용한 GitHub fork와 디렉토리 구조에 맞게 수정했어.
더 수정할 부분이 있으면 알려줘!
4. Run the Installation Script (First Pass)
Inside the version-specific directory, you’ll find an install.sh script. Run it to install and configure the enhanced session components:
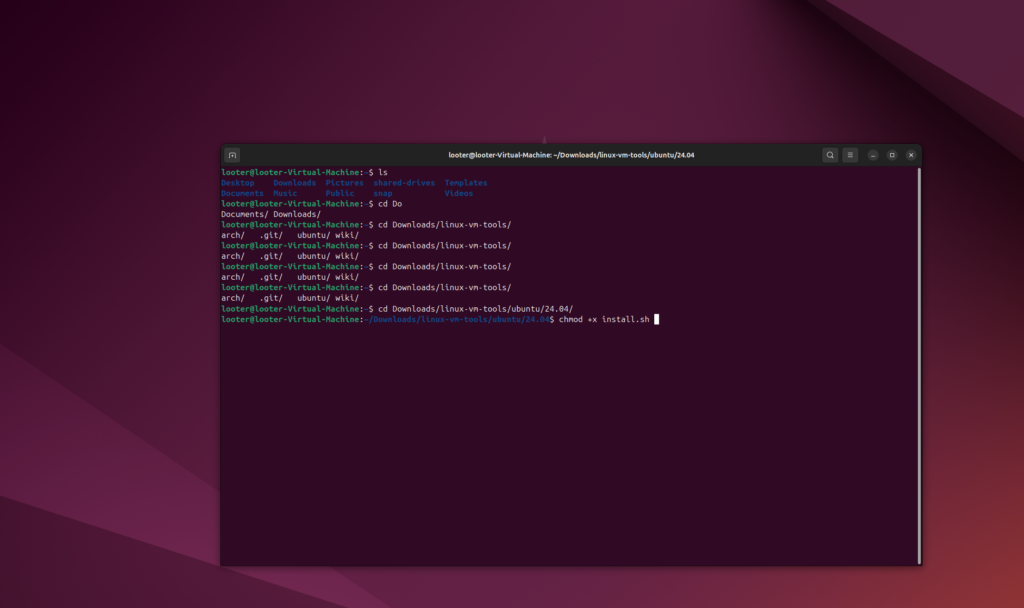
- Execute the script: First, give the script execute permission and run it with root privileges:
chmod +x install.sh sudo ./install.sh- This script will install XRDP and related packages and apply necessary configuration changes for Hyper-V (Enabling enhanced session in Hyper-V for Ubuntu 20: This works for me, although it seems that Hyper-V quick create now supports enhanced session by default. #ubuntu #hyperv · GitHub) (Composite Thrashing Code Adron’s success in misadventures of thrashing coding and calamity! Ubuntu on Hyper-V, Insuring Enhanced Session Works). In particular, it will:
- Reboot when prompted: The install script may stop partway and prompt for a reboot before it can complete installation. For example, if a kernel update was installed, the script will detect that a reboot is required (it checks for
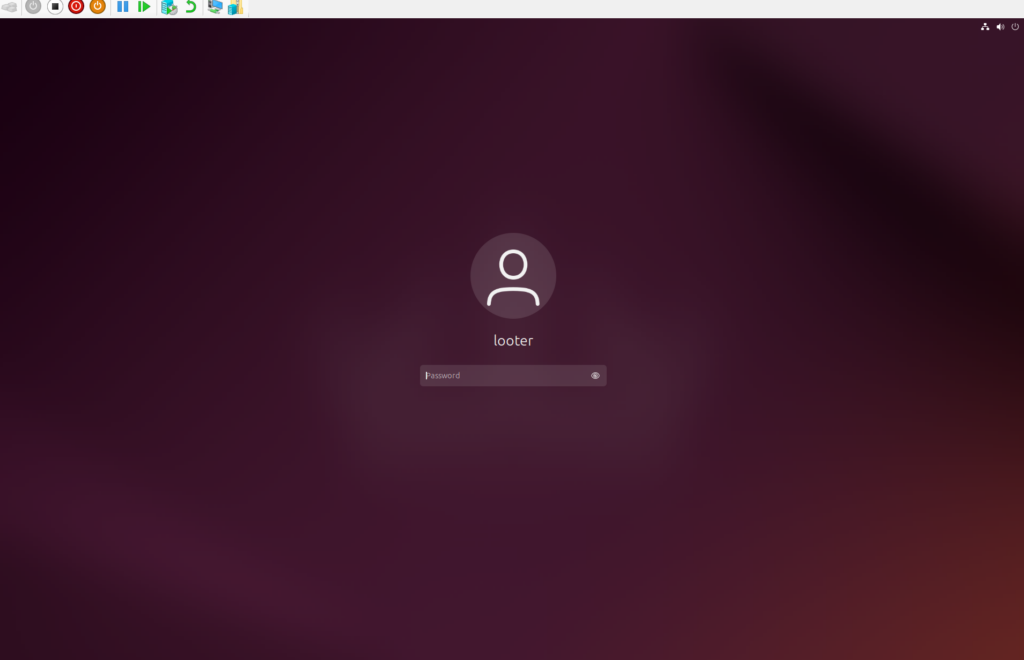
/var/run/reboot-required) and exit with a message (Enabling enhanced session in Hyper-V for Ubuntu 20: This works for me, although it seems that Hyper-V quick create now supports enhanced session by default. #ubuntu #hyperv · GitHub). If you see a notice to reboot, go ahead and reboot the VM. Otherwise, once the script finishes the first pass, reboot the Ubuntu VM manually to ensure all changes (like new kernel or services) take effect (Enabling enhanced session in Hyper-V for Ubuntu 20: This works for me, although it seems that Hyper-V quick create now supports enhanced session by default. #ubuntu #hyperv · GitHub).
5. Run the Installation Script again (Second Pass)
After rebooting, log back into Ubuntu (still in basic session mode for now) and run the script a second time to finish the setup:
- Rerun the script: Open the terminal and navigate to the
linux-vm-tools/ubuntu/24.04directory again (if not already there). Then run:sudo ./install.shThe script will continue the installation, compiling and installing the remaining components (such as the Xorg XRDP modules) and finalizing configuration. This second run is necessary because the first run had to reboot before everything could be installed (Enabling enhanced session in Hyper-V for Ubuntu 20: This works for me, although it seems that Hyper-V quick create now supports enhanced session by default. #ubuntu #hyperv · GitHub). Be patient; this step can take a while to complete (Enabling enhanced session in Hyper-V for Ubuntu 20: This works for me, although it seems that Hyper-V quick create now supports enhanced session by default. #ubuntu #hyperv · GitHub). - Shutdown the VM: When the script finishes, it will output that installation is complete. At this point, power off the Ubuntu VM (you can use
sudo shutdown -h now) (Enabling enhanced session in Hyper-V for Ubuntu 20: This works for me, although it seems that Hyper-V quick create now supports enhanced session by default. #ubuntu #hyperv · GitHub). The Ubuntu guest is now ready for enhanced sessions on its side.
6. Configure Hyper-V to Use Enhanced Session Mode for this VM
Now that Ubuntu is prepared, you need to tell Hyper-V to use the enhanced mode connection for this VM:
- Set the Enhanced Session transport to HvSocket: On the Windows host, open PowerShell as Administrator. Run the following command (replace YourVMName with the name of your VM):
Set-VM -VMName "YourVMName" -EnhancedSessionTransportType HvSocketThis enables Hyper-V’s vsock transport for enhanced sessions on that VM (How to Enable Hyper-V Enhanced Session for Ubuntu 20.04 VMs). (If your VM name has spaces, wrap it in quotes as shown. In case you get an error that the parameter is not found, make sure your Windows and PowerShell are updated to a version that supports this feature (How to Enable Hyper-V Enhanced Session for Ubuntu 20.04 VMs).) - (If you skipped Step 1): Ensure Enhanced Session Mode is allowed in Hyper-V Settings for the host, as described earlier, otherwise the VM will not offer an enhanced session. All integration services for the VM should also be enabled.

7. Start the VM in Enhanced Session Mode
Everything is set! You can now boot Ubuntu and use Enhanced Session Mode:
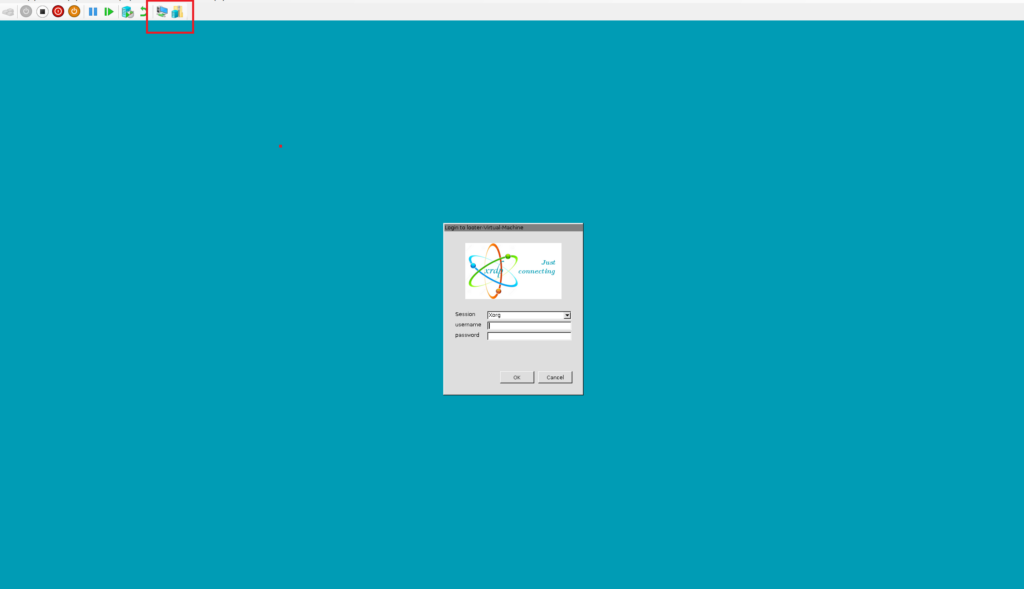
- Launch an enhanced session: Start the Ubuntu VM from Ubuntu VM. When you connect, you should see a “Connect” window with configuration options (such as Display resolution and Local resources to share) instead of the normal console immediately (Onboarding: Ubuntu · microsoft/linux-vm-tools Wiki · GitHub). This is the Ubuntu VM Enhanced Session connection prompt. Choose your desired resolution and resources (or just accept the defaults) and proceed to connect.
- Log in via XRDP: You will be presented with an XRDP login screen (the background may say “xrdp”). Make sure the session is set to Xorg (it usually is by default), then enter your Ubuntu username and password to log in (Onboarding: Ubuntu · microsoft/linux-vm-tools Wiki · GitHub). After a brief pause, you should see your Ubuntu desktop appear. You are now in an enhanced session!
- Verify enhanced features: You can now enjoy integrated features between host and VM. For example, try copying text on the Windows host and pasting it in the Ubuntu VM (or vice versa) – the clipboard is shared in enhanced mode. You can also resize the VM window and Ubuntu will adjust its resolution dynamically. Shared drives will appear under
/mnt(or as “shared-drives” if using the default XRDP config) for easy file transfer. These conveniences are all enabled by Hyper-V’s enhanced session integration (Composite Thrashing Code Adron’s success in misadventures of thrashing coding and calamity! Ubuntu on Hyper-V, Insuring Enhanced Session Works) (Enabling enhanced session in Hyper-V for Ubuntu 20: This works for me, although it seems that Hyper-V quick create now supports enhanced session by default. #ubuntu #hyperv · GitHub).
Troubleshooting Tips: If the Enhanced Session option is still grayed out after following the steps, double-check that the VM was shut down and started fresh (not just restarted), and that HvSocket transport is enabled for the VM (Step 6). Also ensure you’re logging in on the XRDP screen (not the normal Ubuntu GUI login) and that you did not set Ubuntu to auto-login (Onboarding: Ubuntu · microsoft/linux-vm-tools Wiki · GitHub). If you encounter a blank screen or disconnect when connecting, it might be a sign that the XRDP session failed – often this can happen if Wayland was still enabled or if auto-login was on. Revisit the script steps to ensure everything was applied (you can re-run the install script if needed).
By following this guide, you have enabled Ubuntu VM Enhanced Session Mode for your Ubuntu VM. You should now have a much more seamless and “VM Connect” experience with Ubuntu, including clipboard integration, drive sharing, and a full desktop experience in the Ubuntu VM console. Enjoy your enhanced Ubuntu session on Hyper-V!
Sources: The steps above are based on Microsoft’s official guidance and community solutions for getting Ubuntu working with Ubuntu VM Enhanced Session Mode (Onboarding: Ubuntu · microsoft/linux-vm-tools Wiki · GitHub) (Enabling enhanced session in Hyper-V for Ubuntu 20: This works for me, although it seems that Hyper-V quick create now supports enhanced session by default. #ubuntu #hyperv · GitHub),

updated to accommodate newer Ubuntu releases and fixes (like forcing Xorg over Wayland (Ubuntu 19.10 で Hyper-V の Enhanced Mode を有効にする (Enable the Enhanced Mode with Ubuntu 19.10) | みむらの手記手帳) and using Hyper-V sockets for the session transport (Enabling enhanced session in Hyper-V for Ubuntu 20: This works for me, although it seems that Hyper-V quick create now supports enhanced session by default. #ubuntu #hyperv · GitHub)).
These fixes and the installation process were derived from Microsoft’s linux-vm-tools scripts and documented setups (Enabling enhanced session in Hyper-V for Ubuntu 20: This works for me, although it seems that Hyper-V quick create now supports enhanced session by default. #ubuntu #hyperv · GitHub) (Composite Thrashing Code Adron’s success in misadventures of thrashing coding and calamity! Ubuntu on Hyper-V, Insuring Enhanced Session Works). References include official documentation and blog posts that provided the commands and configurations used in this tutorial (How to Enable Hyper-V Enhanced Session for Ubuntu 20.04 VMs) (Composite Thrashing Code Adron’s success in misadventures of thrashing coding and calamity! Ubuntu on Hyper-V, Insuring Enhanced Session Works).