🐳 Common Symptoms of Docker Uninstall and Reinstall Problems on Windows
Fix Docker uninstall and install issues on Windows by first recognizing the symptoms. When Docker Desktop starts acting up, it often does so without a clear explanation. Whether you’re trying to remove it or reinstall it from scratch, certain errors repeatedly appear.
I tried everything—and in the end, this guide was the only thing that actually worked.
❗ Why Recognizing the Right Symptom Matters
Before you can fix a problem, you need to correctly identify it. Docker issues might look like a Windows problem, a virtualization bug, or even a networking issue. But if you’re seeing one of the following, there’s a good chance Docker is the culprit.
🚫 Symptoms During Docker Uninstallation
1. The uninstall window opens, but nothing happens
You might see:
“Uninstalling Docker Desktop…”
…with no progress bar, no spinning icon, and no error message.
This usually means the uninstall process is stuck or blocked by a background service.
2. No reaction at all when clicking “Uninstall”
When uninstalling via the Settings > Apps menu, sometimes nothing happens — no prompt, no confirmation, just silence.
This is often due to corrupted registry entries or Docker’s own uninstaller failing to launch.
3. Docker process is still running in Task Manager
Even after attempting to uninstall, Docker Desktop.exe, com.docker.backend.exe, or Docker Installer.exe might still be visible in Task Manager. This means the software is partially active and can’t be removed safely.
💥 Symptoms During Docker Reinstallation
1. Error: context deadline exceeded
This cryptic message appears when Docker is checking required Windows features like Hyper-V or WSL2 — and times out due to feature detection failure or system delay.
You’ll typically see this error during:
Running engine: waiting for the VM setup to be ready: checking preconditions...
2. Error: WSL 2 installation is incomplete
Docker relies on Windows Subsystem for Linux 2. If it’s not installed or not configured correctly, this error will stop the setup instantly.
Even if WSL is installed, you may still see this if the kernel version is outdated.
3. Docker stuck at 0% during installation
This can happen due to:
- DISM corruption
- A broken previous install
- Windows update remnants blocking access
Even after waiting 10+ minutes, there’s no progress.
4. Error: Virtual Machine Platform is not enabled
This occurs when Docker requires virtualization support, but your system doesn’t have the Virtual Machine Platform Windows feature enabled.
It can be misleading because your BIOS might support virtualization — but Docker won’t proceed until this Windows feature is turned on.
🧩 Bonus: System-Level Symptoms That Can Be Related to Docker
- WSL commands like
wsl --list --verbosehang or error out - System services like
LxssManagerfail to start - Hyper-V Manager reports no virtual switches or VMs
- The Windows “Turn Windows features on or off” dialog shows a blank screen (Docker feature dependencies cannot load)
These clues suggest that something deeper in Windows is affecting Docker’s environment.
🧪 Summary Checklist: Do You Have These Symptoms?
| Symptom | Possible Cause |
|---|---|
| Uninstall stuck | Background services running, registry corruption |
| Reinstall fails | Windows feature disabled, WSL2 missing |
| DISM fails at 0% | System file corruption, Windows Update issues |
| Setup crashes or hangs | Previous Docker instance wasn’t fully removed |
✅ Next Steps
If you’ve seen any of the above, your Docker setup is either partially broken or blocked by system-level issues. Don’t worry — in the next part of this series, we’ll cover exact step-by-step fixes for uninstall problems that seem impossible to resolve.
🔗 Related Posts in This Series
- Part 2: How to Fix a Stuck Docker Uninstall on Windows
- Part 3: Fixing Docker Installation Failures (VM Setup, WSL2)
- Part 4: Solving DISM and SFC Errors When Installing Docker
- Part 5: Full Recovery Routine for Docker on Windows
Would you like to continue with Part 2: Fixing Docker Uninstall That Gets Stuck now? I’ll make it even more detailed and technical.
Table of Contents
🔧 Part 2: How to Fix a Stuck Docker Uninstall on Windows
Uninstalling Docker Desktop on Windows should be simple — open Settings, hit Uninstall, and you’re done. But for many users, it turns into a nightmare. The uninstaller hangs, the window freezes, or nothing happens at all. In this guide, we’ll walk you through every way to fix a stuck Docker uninstall, step by step.
❗ What Does “Stuck Uninstall” Look Like?
You may be experiencing one of the following:
- The uninstallation window appears but never progresses
- You click “Uninstall” and nothing happens
- The uninstall process disappears suddenly without removing anything
- Docker still shows up in Task Manager or startup
These symptoms point to a partially broken or corrupted Docker install that can’t be removed through normal methods.
🧯 Step 1: Kill Docker-Related Processes
Sometimes the uninstaller is blocked by Docker itself still running.
🔍 Instructions:
- Press
Ctrl + Shift + Escto open Task Manager - End these tasks if they appear:
Docker Desktop.execom.docker.backend.exeDocker Installer.exevmmem(for WSL/Hyper-V)
- Close Task Manager and try uninstalling again
If this still doesn’t work, move to the next step.
🛠 Step 2: Use PowerShell to Uninstall Docker
When the GUI fails, PowerShell can force the uninstall process.
Option A: Using WMI
Get-WmiObject -Query "select * from Win32_Product where Name like '%Docker%'" | ForEach-Object { $_.Uninstall() }
Option B: Using WMIC
wmic product where "name like 'Docker%%'" call uninstall
💡 Note: You must run PowerShell as Administrator.
If the command says the product is not found or fails, it’s likely already partially removed. In that case, proceed to manually remove leftover files.
🗂 Step 3: Manually Delete Docker Leftovers
Even after failed uninstall attempts, Docker often leaves behind large directories that interfere with reinstallation.
✅ Delete These Folders:
C:\Program Files\Docker\
C:\ProgramData\DockerDesktop\
C:\Users\%USERNAME%\AppData\Local\Docker\
C:\Users\%USERNAME%\AppData\Roaming\Docker\
You may need Administrator rights or to stop certain services (like WSL or Hyper-V) before deletion.
🧼 Step 4: Use Third-Party Uninstaller Tools (Optional but Recommended)
To ensure registry entries and services are cleaned up:
Recommended Tools:
These tools scan for remaining registry keys and hidden services after forced uninstalls. Use the “Forced Uninstall” or “Advanced Scan” options to clean Docker completely.
🧪 Step 5: Check Windows Feature Dependencies (Optional)
Docker relies on several optional Windows features. If uninstall hangs due to a broken feature, disable them temporarily.
Disable-WindowsOptionalFeature -Online -FeatureName VirtualMachinePlatform
Disable-WindowsOptionalFeature -Online -FeatureName Microsoft-Windows-Subsystem-Linux
Disable-WindowsOptionalFeature -Online -FeatureName Hyper-V
Reboot and retry the uninstall or cleanup process.
📋 Summary: Fixing a Stuck Docker Uninstall
| Step | What to Do |
|---|---|
| 1 | Kill all Docker-related processes |
| 2 | Use PowerShell or WMIC to uninstall |
| 3 | Delete leftover folders manually |
| 4 | Use third-party uninstaller tools |
| 5 | Disable Windows features if needed |
✅ What’s Next?
Now that you’ve successfully removed Docker, you’re ready to tackle reinstallation. But be careful — if Docker fails to reinstall, it may be due to missing system components like Hyper-V or WSL2.
📖 Continue to Part 3: Fixing Docker Installation Failures (VM Setup, WSL2 Errors)
Would you like to proceed to Part 3: Docker reinstall error fixes?
Or shall I create a featured image or thumbnail for this post next?
🧱 Part 3: Fix Docker Installation Failures on Windows (VM Setup, WSL2, Hyper-V Errors)
Docker Desktop installation on Windows often fails — not because the installer is broken, but because Windows itself isn’t properly configured for virtualization. In this part, we cover the most common Docker installation errors, what causes them, and how to fix them step by step.
🧯 Most Common Docker Installation Errors
When trying to install Docker, you might encounter one of these:
❌ Error 1:
context deadline exceeded
“waiting for the VM setup to be ready: checking preconditions…”
💡 Cause:
Docker is waiting for certain Windows features (like Virtual Machine Platform or WSL2) that are either disabled or not responding.
❌ Error 2:
WSL 2 installation is incomplete
💡 Cause:
WSL2 (Windows Subsystem for Linux version 2) is either not installed, outdated, or corrupted.
❌ Error 3:
Virtual Machine Platform is not enabled
💡 Cause:
The required virtualization layer is not enabled in Windows Features or BIOS.
❌ Error 4:
Installation freezes at 0% and never progresses
💡 Cause:
System file corruption, leftover Docker configurations, or DISM-related issues are blocking the setup.
🛠 Step-by-Step Fixes
Let’s go through each fix in order.
✅ Fix 1: Enable Required Windows Features
Run PowerShell as Administrator and execute the following:
Enable-WindowsOptionalFeature -Online -FeatureName VirtualMachinePlatform -All
Enable-WindowsOptionalFeature -Online -FeatureName Microsoft-Windows-Subsystem-Linux -All
Enable-WindowsOptionalFeature -Online -FeatureName Hyper-V -All
Once done, reboot your computer.
💡 These features are essential for Docker Desktop to create a virtualized Linux environment.
✅ Fix 2: Install or Update the WSL2 Kernel
Even if WSL2 is enabled, you still need the updated kernel driver.
- Download the latest kernel from:
👉 https://aka.ms/wsl2kernel - Install the
.msipackage - Reboot
You can verify WSL2 is working with:
wsl --status
✅ Fix 3: Confirm Virtualization Is Enabled in BIOS
Instructions:
- Reboot your computer and enter the BIOS/UEFI settings
- Find Intel VT-x (or AMD-V) and ensure it is enabled
- Save & exit
On most systems, you can enter BIOS using Del, F2, or F10 during startup.
✅ Fix 4: Clear Out Leftovers From Previous Installs
Old files can block new installs. Delete these folders:
C:\Program Files\Docker\
C:\ProgramData\DockerDesktop\
C:\Users\%USERNAME%\AppData\Local\Docker\
C:\Users\%USERNAME%\AppData\Roaming\Docker\
And clean up Windows Registry using Revo Uninstaller or Geek Uninstaller.
✅ Fix 5: Use Updated Docker Installer
Always use the latest version from the official site:
👉 https://www.docker.com/products/docker-desktop/
Older installers may be incompatible with your current Windows version or WSL2 setup.
✅ Fix 6: Reset the Windows Feature Cache (Advanced)
Sometimes “checking preconditions” hangs due to feature cache issues. Run:
DISM /Online /Cleanup-Image /StartComponentCleanup
Then:
sfc /scannow
If DISM or SFC fails, we’ll cover those issues in Part 4.
✅ Summary Table
| Issue | Fix |
|---|---|
context deadline exceeded | Enable VM Platform, WSL2, Hyper-V |
WSL 2 installation is incomplete | Install WSL2 kernel update |
VM Platform is not enabled | Enable via PowerShell + BIOS |
| Stuck at 0% | Cleanup system + use DISM/SFC |
📌 Next Step: Verify Installation Worked
After rebooting, run:
docker version
docker info
Or check Docker Desktop’s status in your system tray.
🔄 What’s Next?
Still seeing errors? Your Windows system might have deeper issues preventing virtualization or component access. In that case, continue to:
📖 Part 4: Fix DISM and SFC Errors That Prevent Docker Installation
Would you like me to continue with Part 4: DISM & SFC error resolution next?
Or would you like an image or summary table graphic for this section?
좋습니다! 이어서 Part 4: Solving DISM and SFC Errors That Prevent Docker Installation 전문화된 포스트를 작성해드리겠습니다.
🛠 Part 4: Solving DISM and SFC Errors That Prevent Docker Installation
Sometimes, Docker fails to install not because of Docker itself — but because Windows system tools like DISM and SFC are broken or unresponsive. If you’ve tried everything but Docker still won’t install, it’s likely a Windows-level integrity issue. This post will walk you through how to fix these hidden blockers and ensure your system is ready for Docker.
🧯 Common Symptoms of DISM or SFC Problems
You may notice one or more of these:
- Docker installation freezes at 0%
- You get this during installation:
"context deadline exceeded"or"checking preconditions..." - Running:
DISM /Online /Cleanup-Image /RestoreHealthhangs at 0% and never progresses - DISM or SFC returns:
The source files could not be foundThe restore operation failedWindows Resource Protection could not perform the requested operation
These signs indicate that system-level corruption or a broken update mechanism is blocking Docker.
✅ Step-by-Step Fixes for DISM and SFC Issues
✅ Fix 1: Use DISM with Component Cleanup First
Start by cleaning up the Windows update cache:
DISM /Online /Cleanup-Image /StartComponentCleanup
Then try:
DISM /Online /Cleanup-Image /RestoreHealth
This often unlocks stuck DISM issues.
✅ Fix 2: Use System File Checker (SFC)
Run this after the DISM cleanup:
sfc /scannow
What the output means:
Windows Resource Protection found corrupt files and successfully repaired them: ✔️ You’re good.Windows Resource Protection could not fix some files: ❌ You’ll need additional steps.
✅ Fix 3: Reset Cryptographic Services (catroot2 reset)
Many DISM issues are caused by corrupted cryptographic services.
net stop cryptsvc
takeown /f C:\Windows\System32\catroot2 /r /d y
rd /s /q C:\Windows\System32\catroot2
net start cryptsvc
This is safe — the catroot2 folder will regenerate automatically.
✅ Fix 4: Use a Windows ISO as a Source (Offline Recovery)
If DISM keeps failing with:
The source files could not be found
Then use a mounted Windows ISO image as a source.
Step-by-Step:
- Download the same version of Windows ISO you’re using
- Mount it (right-click > Mount)
- Check which image is available:
DISM /Get-WimInfo /WimFile:E:\sources\install.wim
- Then run:
DISM /Online /Cleanup-Image /RestoreHealth /Source:WIM:E:\sources\install.wim:1 /LimitAccess
Replace
E:with the ISO drive letter. Useinstall.esdifinstall.wimdoesn’t exist.
✅ Fix 5: Clean SoftwareDistribution Folder (Windows Update Cache)
Corrupt update cache may also block DISM/SFC.
net stop wuauserv
net stop bits
rename C:\Windows\SoftwareDistribution SoftwareDistribution.old
net start wuauserv
net start bits
Then rerun:
sfc /scannow
DISM /Online /Cleanup-Image /RestoreHealth
📋 Summary Table
| Problem | Fix |
|---|---|
| DISM stuck at 0% | Run StartComponentCleanup first |
| Source files not found | Use ISO or ESD as restore source |
| Corrupted crypto service | Reset catroot2 |
| Windows Update breaks DISM | Clear SoftwareDistribution cache |
| SFC cannot fix files | Use DISM with ISO, then rerun SFC |
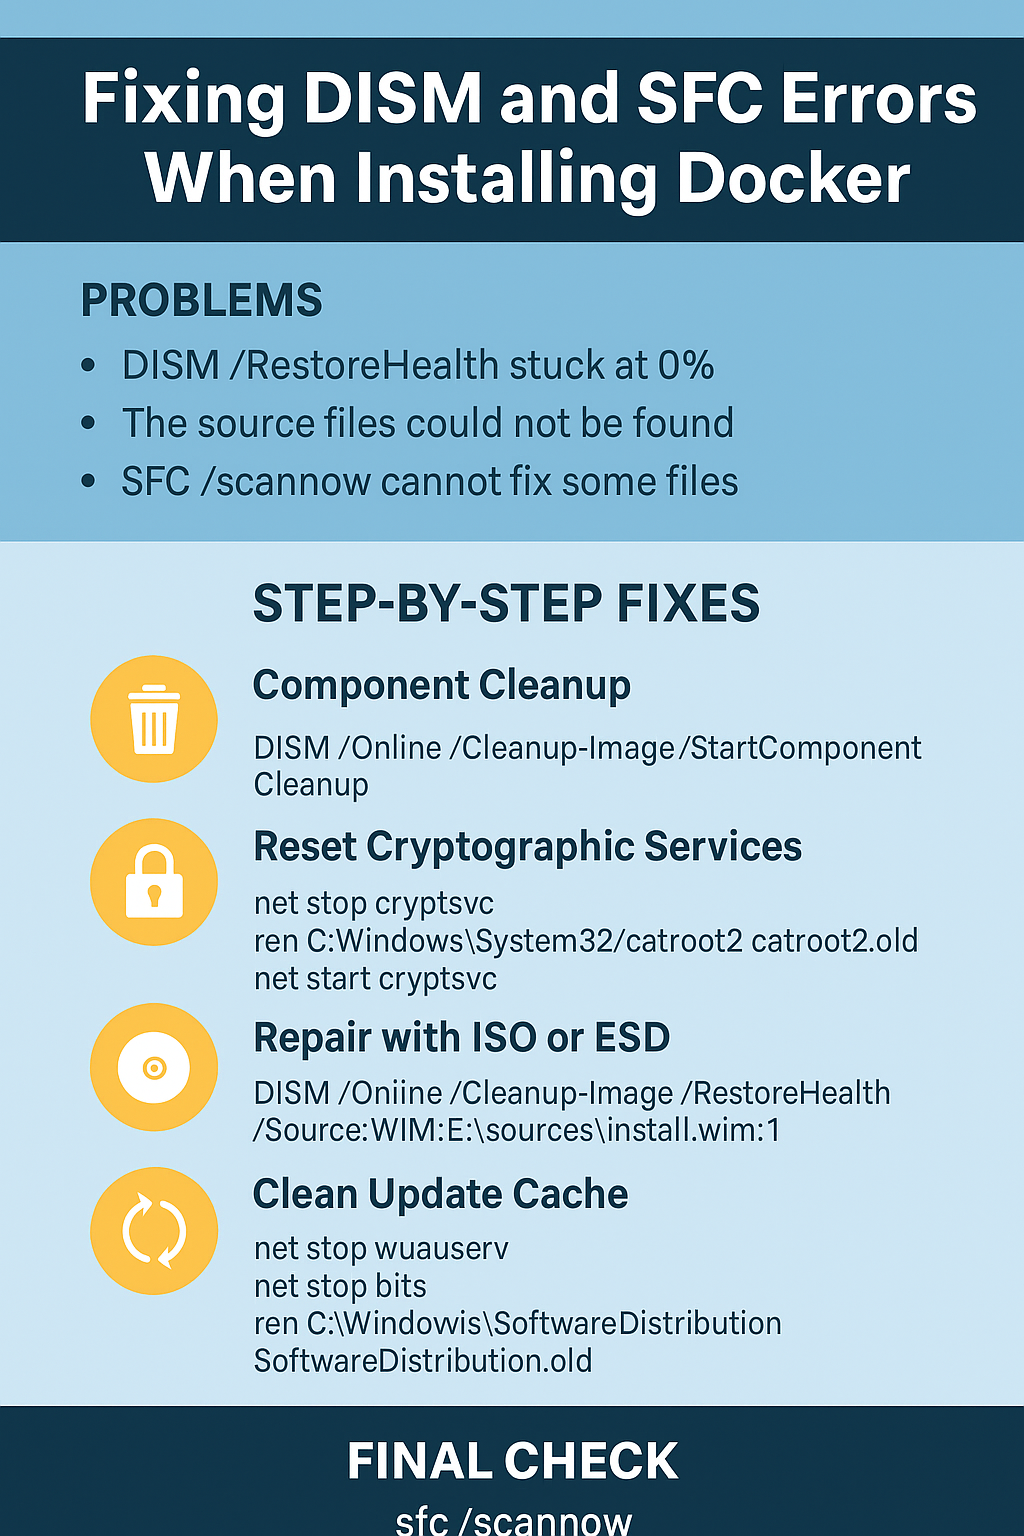
🔍 Final System Check Before Reinstalling Docker
After all the above:
- Restart the system
- Run:
sfc /scannow
DISM /Online /Cleanup-Image /RestoreHealth
- Then try Docker Desktop installation again from:
👉 https://www.docker.com/products/docker-desktop/
🔄 What’s Next?
You’ve now removed all hidden blockers. In the final part of this series, we’ll combine everything into a clean, repeatable recovery workflow to restore Docker even on broken systems.
📖 Continue to Part 5: Full Docker Recovery Workflow — From Broken to Working
좋습니다! 이제 마지막 Part 5: Full Docker Recovery Workflow — From Broken to Working 를 전문화해서 정리해드립니다.
🧩 Part 5: Full Docker Recovery Workflow — From Broken to Working
If you’ve tried uninstalling and reinstalling Docker but keep running into problems — from stuck installers to DISM errors — it’s time to execute a full recovery workflow. This guide brings together everything we’ve covered in this series to help you start from a clean state and guarantee a successful Docker Desktop setup.
✅ Overview: Why You Need a Full Recovery Workflow
Docker Desktop relies on a delicate stack of Windows components:
- WSL2
- Virtual Machine Platform
- Hyper-V
- System health (DISM/SFC)
If any one of these breaks, Docker will likely fail. That’s why a full cleanup and restoration plan works better than trying to patch one symptom at a time.
🧱 Full Docker Recovery Workflow (Step-by-Step)
🔥 Step 1: Force Uninstall Docker
- Kill running Docker processes in Task Manager:
Docker Desktop.execom.docker.backend.exevmmem
- Run PowerShell (Admin):
Get-WmiObject -Query "select * from Win32_Product where Name like '%Docker%'" | ForEach-Object { $_.Uninstall() }
- Delete leftover folders:
C:\Program Files\Docker\
C:\ProgramData\DockerDesktop\
C:\Users\%USERNAME%\AppData\Local\Docker\
C:\Users\%USERNAME%\AppData\Roaming\Docker\
- (Optional) Use Revo Uninstaller or Geek Uninstaller for deep cleanup.
🔧 Step 2: Repair Windows Components
Check and repair the system before reinstalling Docker.
- Start with component cleanup:
DISM /Online /Cleanup-Image /StartComponentCleanup
- Then repair system files:
sfc /scannow
DISM /Online /Cleanup-Image /RestoreHealth
- If stuck or errors appear:
- Reset catroot2
- Clear SoftwareDistribution folder
- Use ISO as restore source (see Part 4)
⚙️ Step 3: Enable Required Windows Features
Run in PowerShell (Admin):
Enable-WindowsOptionalFeature -Online -FeatureName VirtualMachinePlatform -All
Enable-WindowsOptionalFeature -Online -FeatureName Microsoft-Windows-Subsystem-Linux -All
Enable-WindowsOptionalFeature -Online -FeatureName Hyper-V -All
📥 Step 4: Install WSL2 Kernel
Download from:
👉 https://aka.ms/wsl2kernel
Install the .msi package and reboot.
Verify with:
wsl --status
💻 Step 5: Reinstall the Latest Docker Desktop
Get the latest version from:
👉 https://www.docker.com/products/docker-desktop/
Run the installer as Administrator.
During setup, choose WSL2 backend instead of Hyper-V if your PC doesn’t support virtualization in BIOS.
🔍 Final Verification
After install completes:
docker --version
docker info
If these commands return info without errors — Docker is successfully restored.
📋 Recap: One-Page Workflow
| Step | Action |
|---|---|
| 1 | Force uninstall and delete leftovers |
| 2 | Repair DISM, SFC, and Windows features |
| 3 | Enable Virtual Machine Platform, Hyper-V, WSL2 |
| 4 | Install WSL2 kernel |
| 5 | Download & reinstall Docker Desktop |
| 6 | Test with docker info and docker version |
✅ Conclusion: From Broken to Working
By following this full recovery workflow, you’ve effectively:
- Removed all traces of a corrupted Docker setup
- Repaired system tools that could block installs
- Re-enabled virtualization layers
- Verified your Docker environment is working again
🎉 You’ve now achieved a clean, working Docker setup — even from the most broken state.
🚫 Still facing Docker startup issues even after reinstalling and resetting everything? One lesser-known but surprisingly common cause is a conflict between Docker and USB dongles—especially Bluetooth or Wi-Fi adapters.
If that sounds like your case, check out our complete solution guide here:
👉 How to Fix Docker USB Dongle Conflicts That Block Initialization