🧭 Section 1: Introduction – Why Learn Bash Shell Commands?
If you’ve ever seen someone working in a black terminal window and typing what looks like arcane spells, you’ve already encountered bash shell commands. These are the core tools that allow you to directly communicate with your computer using the command-line interface (CLI), instead of relying on graphical buttons or menus.
For beginners, the idea of typing commands instead of clicking can feel intimidating at first. But here’s the truth: learning bash shell commands isn’t just for hackers, sysadmins, or Linux gurus—it’s for anyone who wants to take control of their computer in a faster, more efficient, and far more powerful way.
In this guide, we’ll help you understand and master the essential Linux terminal commands step by step, with real-world examples and easy-to-follow explanations.
🧩 What Exactly Are Bash Shell Commands?
Bash shell commands are the foundational instructions you use in a Unix-like terminal environment—whether that’s Linux, macOS, or even Windows Subsystem for Linux (WSL). These commands let you:
- Navigate through folders and directories
- Create, copy, or delete files
- Monitor your system’s performance
- Search and process text
- Modify file permissions and ownership
- Automate tasks with scripts
These commands are short, powerful, and when used together, can handle everything from routine maintenance to advanced automation. Think of them as the alphabet of the command-line language—once you know the basics, you can construct anything.
🧠 Why Are Bash Shell Commands Still Important in 2025?
You might be thinking, “Isn’t everything GUI-bashd these days?” True—graphical user interfaces are more intuitive and visually appealing. But when it comes to speed, flexibility, and automation, CLI still reigns supreme in 2025 and beyond.
Here’s why these commands are still essential:
- Speed & Efficiency
Performing bulk operations like renaming 1000 files or extracting system logs is often 10x faster with a single command than manually doing it through a file explorer. - Automation Possibilities
Bash shell commands are the core ingredients of shell scripts—automated tasks that can save you hours each week. They’re the first step toward DevOps, CI/CD, and even AI-powered workflows. - Remote System Management
In cloud computing and server administration, GUI access is often disabled. SSH access through terminal is the standard—and shell commands are your only tools. - Troubleshooting and Recovery
When things go wrong and your graphical interface fails, the terminal is often the only way to fix your system. - Cross-Platform Power
Shell commands work similarly across many operating systems—making your skills more portable and career-ready.
Simply put, understanding shell commands gives you superpowers over your system.
🔎 Real-World Example: GUI vs Shell Speed
Let’s say you want to delete all .log files inside a folder that has hundreds of nested subfolders. In a GUI, that means:
- Opening your file explorer
- Navigating manually through each subfolder
- Deleting files one by one
…Time-consuming and error-prone.
With the terminal?
bash복사편집find . -name "*.log" -delete
One line. One second. One thousand files gone.
That’s the power of knowing bash shell commands.
🎯 Who Should Learn Bash Shell Commands?
This guide is written for:
- 🧑💻 New Linux users who want to understand what’s happening behind the scenes
- 🧰 Developers looking to speed up their workflow with shell automation
- 🖥️ Sysadmins managing remote servers and cron jobs
- 🧑🎓 Students studying computer science, cloud infrastructure, or cybersecurity
- 💡 Tinkerers and hobbyists who just want to build cool things with Raspberry Pi or WSL
If you want to feel confident using the terminal—not scared of it—this guide will help you get there.
🔄 What You’ll Learn in This Guide
By the end of this series, you’ll be able to:
✅ Confidently move around the Linux filesystem
✅ Manage files with precision (copy, move, delete, rename)
✅ Monitor system resources and troubleshoot issues
✅ Automate workflows using pipes, redirection, and simple scripts
✅ Understand what’s happening when your GUI fails
✅ Use commands that are transferable across distributions (Ubuntu, Fedora, Arch) or even platforms (Linux, macOS, WSL)
⛳ Final Thought Before We Begin
You don’t need to memorize hundreds of commands to be productive. You just need to understand the 40–50 most useful ones and how to combine them creatively.
This guide is your practical roadmap.
Let’s start your command-line journey with the most fundamental skill: navigating the filesystem.
👉 Up Next: Section 2 – Navigating the Filesystem Using Shell Commands
Table of Contents
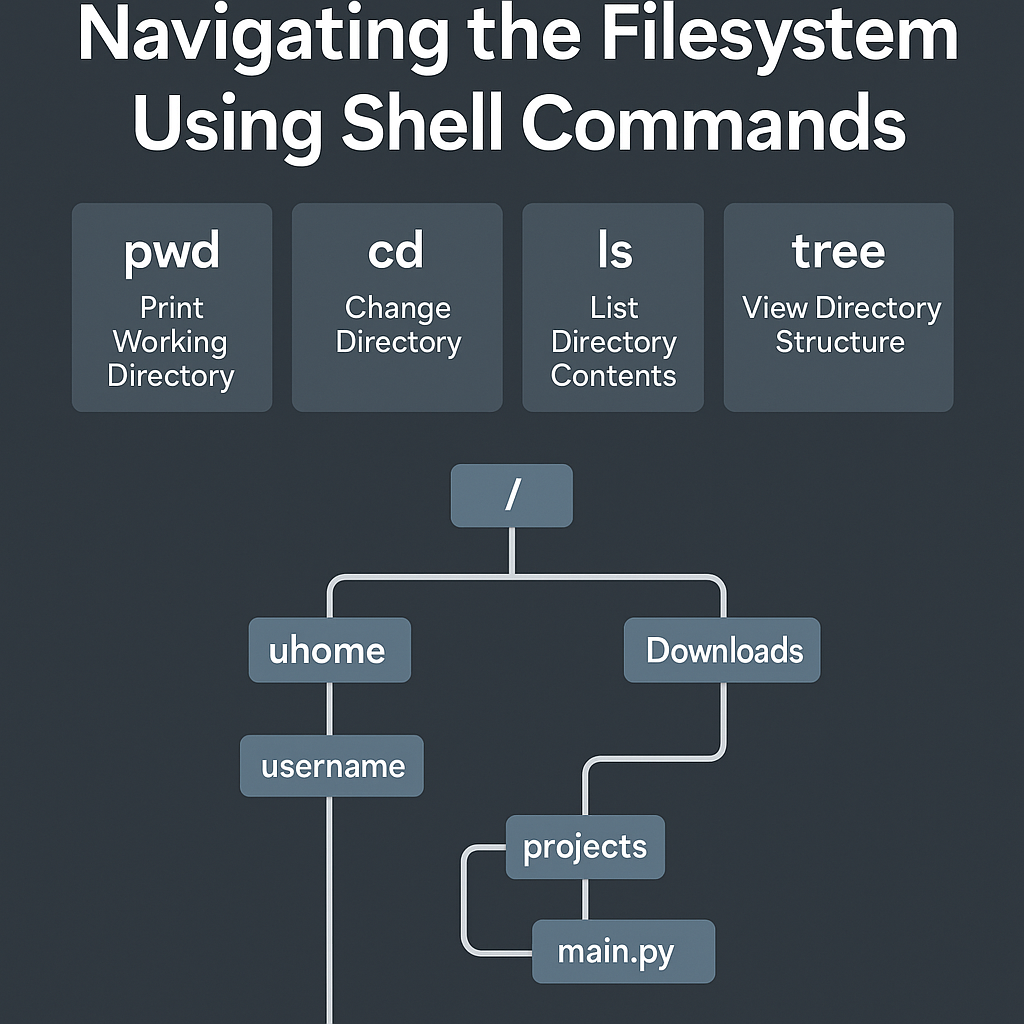
📁 Section 2: Navigating the Filesystem Using Shell Commands
Before you can manage files or run programs from the terminal, you need to understand how to navigate the filesystem using bash shell commands. Think of your Linux filesystem like a massive tree. The command-line interface gives you the tools to move between branches, explore folders, and manipulate their contents quickly and efficiently.
Whether you’re running Ubuntu, Fedora, or WSL, these file management commands are fundamental to using the terminal productively.
📌 Understanding the Filesystem Structure in Linux
In Linux and other Unix-bashd systems, the filesystem starts at the root directory, symbolized by a single forward slash /. From there, all other directories branch out. Here are a few important ones:
/home– User home directories/etc– System configuration files/var– Log files and variable data/usr– User-installed applications and libraries/tmp– Temporary files
Unlike Windows, there are no drive letters (like C:\). Everything is a path that starts from /.
🧭 Essential Navigation Commands
Let’s look at the most important bash shell commands for filesystem navigation:
🔹 pwd – Print Working Directory
This command tells you where you are in the filesystem.
pwd
Example Output:
/home/username/projects
Use this to confirm your current location, especially when working with multiple terminal windows.
🔹 cd – Change Directory
Use cd (change directory) to move around.
cd /etc
Common Variations:
cd ~or justcd→ Move to your home directorycd ..→ Move one level upcd -→ Return to previous directory
💡 Tip: Use Tab key for auto-completion when typing long folder names!
🔹 ls – List Directory Contents
This is one of the most used Linux terminal commands. It lists the files and directories in your current location.
ls
Useful Options:
ls -l→ Long listing format (shows permissions, size, date)ls -a→ Show hidden files (those starting with.)ls -lh→ Human-readable sizes
Example:
ls -lah ~/Downloads
🔹 tree – View Directory Structure (Optional Tool)
If you want a visual overview of folders and their hierarchy:
tree
This command may require installation:
sudo apt install tree # for Ubuntu/Debian
Example Output:
.
├── docs
│   └── notes.txt
└── src
    └── main.py
🧪 Real-World Scenario: Moving Between Folders
Let’s say you’re working on a Python project located in /home/yourname/projects/myapp.
cd ~/projects/myapp
pwd
ls -l
You’re now inside your project folder and can view or edit files, create new ones, or navigate deeper into subfolders—all from the terminal.
🔐 Hidden Files and Permissions
When exploring the filesystem, you’ll encounter hidden files (starting with a dot .) like .bashrc, .gitignore, or .env.
Use:
ls -a
to reveal them. These are often configuration files and should be handled with care. In Section 9, we’ll dive deeper into permissions and how to manage them.
🧠 Summary: Navigation Commands You Must Know
| Command | Description |
|---|---|
pwd | Show current directory |
cd | Move between directories |
ls | List files and folders |
ls -a | Show hidden files |
ls -l | Show detailed file info |
tree | View directory tree (optional) |
🚀 Pro Tip: Combine Commands for Efficiency
You can combine navigation with file operations. For example:
cd ~/Documents && ls -lh
This moves into your Documents folder and lists contents with readable formatting—all in one line.
🎯 What You’ve Learned
By now, you should be able to:
- Understand how Linux’s filesystem is structured
- Move around directories using
cd - View contents using
lsandtree - Quickly check where you are with
pwd
These bash shell commands will serve as your daily navigation toolkit in the command-line world.
👉 Next Up: Section 3 – Creating and Organizing Files with Shell Commands
🧱 Section 3: Creating and Organizing Files with Shell Commands
Once you’ve learned how to navigate your filesystem, the next step is knowing how to create and organize files and directories using the terminal. These operations are fundamental to daily development, automation scripts, project management, and even simple file maintenance tasks.
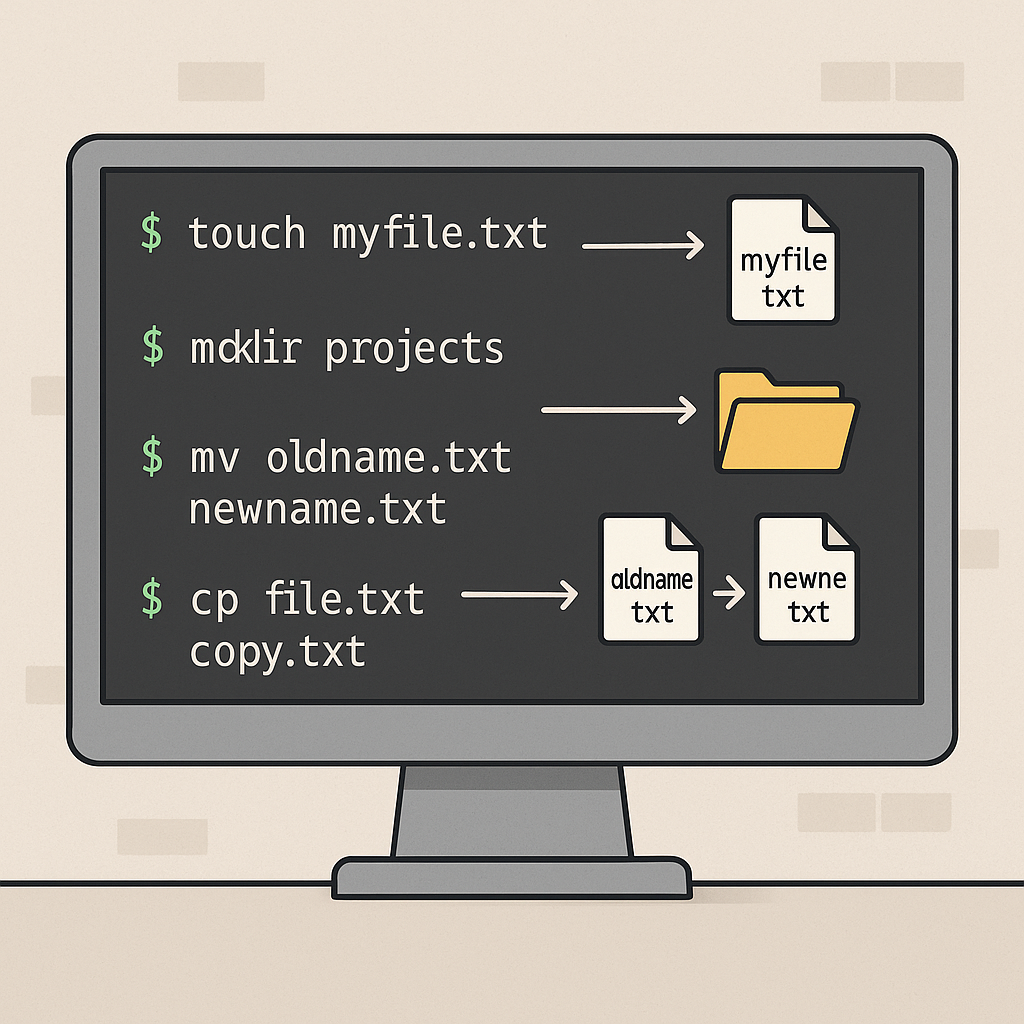
This section introduces some of the most frequently used file management commands in Linux: touch, mkdir, mv, and cp. Mastering these will help you create, move, and structure files with ease—all from the command line.
🗂️ Creating Files with touch
The touch command is one of the simplest ways to create a new empty file.
touch myfile.txt
This will instantly create a file named myfile.txt in the current directory. If the file already exists, touch will simply update its modification timestamp.
Create multiple files at once:
touch report1.txt report2.txt summary.txt
💡 Tip: Great for generating placeholder files during project setup.
🏗️ Creating Directories with mkdir
To create a new folder (directory), use the mkdir command.
mkdir projects
Nested directory creation:
mkdir -p projects/rust/mygame
The -p flag tells mkdir to create parent folders as needed, avoiding errors if the structure doesn’t already exist.
📂 Moving or Renaming Files with mv
Use mv to move files or rename them.
mv oldname.txt newname.txt   # Rename
mv file.txt ~/Documents/     # Move file
mv *.log archive/            # Move multiple files
💡 You can use wildcards like * and ? to move groups of files at once.
Rename a directory:
mv photos images
This is functionally identical to renaming it.
📄 Copying Files and Folders with cp
The cp command is used to duplicate files or entire directories.
cp file.txt copy.txt         # Copy single file
cp -r mydir/ backup/         # Copy entire folder recursively
Useful options:
-r→ Recursive (required for copying directories)-u→ Copy only if source is newer than destination-v→ Verbose output (shows each operation)
Example:
cp -ruv ~/projects ~/projects_backup
🧪 Real-Life Use Case: Organizing a Coding Project
Let’s say you’re creating a new Python app. Here’s how you might structure it from scratch using bash shell commands:
mkdir -p ~/projects/myapp/src
cd ~/projects/myapp
touch README.md requirements.txt
touch src/main.py
Now you have:
myapp/
├── README.md
├── requirements.txt
└── src/
    └── main.py
All created in seconds—no file explorer needed.
🧠 Summary of File Management Commands
| Command | Description |
|---|---|
touch | Create empty files |
mkdir | Make new directories |
mv | Move or rename files and directories |
cp | Copy files and directories |
⚠️ Common Beginner Mistakes
- Forgetting
-rwhen copying folders:cp mydir backup/→ error
✅ Fix:cp -r mydir backup/ - Overwriting files without warning:
mvandcpwill overwrite files without asking. Use-ifor interactive mode:cp -i file.txt backup.txt - Trying to move/copy non-existent paths:
Always useTabcompletion or runlsbefore to verify paths.
📦 Bonus Tip: Batch File Creation with Loops
You can use simple loops to create structured files in seconds:
for i in {1..5}; do touch report_$i.txt; done
Creates:
report_1.txt
report_2.txt
...
report_5.txt
Perfect for quick setup of logs, reports, tests, or templates.
🎯 What You’ve Learned
You now know how to:
- Create single or multiple files with
touch - Build nested directories with
mkdir -p - Move or rename files using
mv - Copy entire folders with
cp -r
These bash shell commands are used daily by Linux professionals, and they’re crucial for anyone working on automation, scripting, or coding projects.
👉 Next Up: Section 4 – Deleting Files and Directories Safely with Shell Commands
🗑️ Section 4: Deleting Files and Directories Safely with Shell Commands
One of the most powerful—and potentially dangerous—operations in the terminal is deleting files and directories. In Linux, there’s no Recycle Bin or “Undo” button in the shell. Once something is deleted via the terminal, it’s gone for good unless you’ve backed it up.
That’s why learning how to safely use bash shell commands for deletion is critical for all users, especially beginners. This section will teach you how to use rm, rmdir, and safety flags like -i, -r, and -f.
🔥 The Power (and Risk) of rm
The rm command is used to remove (delete) files from the filesystem.
rm filename.txt
This will delete the file instantly—no confirmation, no going back.
To avoid accidental deletion, you can use the interactive flag:
rm -i filename.txt
This will prompt:
rm: remove regular file 'filename.txt'? y
💡 Tip: Alias rm to always ask first:
alias rm='rm -i'
🧹 Deleting Multiple Files
You can delete several files at once:
rm file1.txt file2.txt file3.txt
Or use a wildcard to delete by pattern:
rm *.log # Deletes all .log files in current directory
⚠️ Be extremely careful when using wildcards with rm!
🏗️ Deleting Directories: rmdir vs rm -r
🔸 rmdir – Remove an Empty Directory
rmdir myfolder
This works only if the directory is completely empty.
🔸 rm -r – Remove Directory and Contents
If the folder has files or subfolders, use the recursive flag:
rm -r myfolder
This will delete the folder and everything inside it.
🚫 rm -rf: Use With Caution!
rm -rf /
This infamous command will delete your entire system—literally.
Let’s break it down:
-r→ Recursively delete contents-f→ Force deletion without any confirmation
💀 Combined, rm -rf is fast and irreversible. NEVER use this command at root level unless you’re 1000% sure.
🧪 Example: Safely Cleaning Up Old Logs
Let’s say you want to clean up old .log files in a logs/ directory.
Safer method:
rm -i logs/*.log
Or simulate what will be deleted before running:
ls logs/*.log
Then:
rm logs/*.log
✅ Summary of Deletion Commands
| Command | Description |
|---|---|
rm | Delete files |
rm -i | Ask before each delete |
rm -r | Recursively delete directories |
rm -rf | Force delete everything – DANGER |
rmdir | Delete empty directories only |
⚠️ Common Mistakes to Avoid
- Running
rm -rfin the wrong directory
Always usepwdbefore running destructive commands. - Forgetting to check file patterns
rm *.logcan match unintended files. Usels *.logto preview first. - Recursive delete without backups
Always back up important folders before usingrm -r. - Using sudo carelessly
sudo rm -rfis even more dangerous—it bypasses permission checks.
🔒 Bonus Tip: Safer Alternatives
Instead of rm, consider moving files to a trash folder:
mkdir -p ~/.trash
mv file.txt ~/.trash/
Later you can clear that manually when confident.
🎯 What You’ve Learned
In this section, you learned how to:
- Delete files and directories using
rmandrmdir - Use
-i,-r, and-fflags wisely - Avoid common and dangerous deletion mistakes
- Add safety nets (interactive mode or trash method)
Deleting files via shell is fast and powerful—but dangerous if misused. Make sure you understand exactly what you’re deleting before hitting Enter.
👉 Next Up: Section 5 – Viewing File Contents Efficiently with Shell Commands
📄 Section 5: Viewing File Contents Efficiently with Shell Commands
Once you’ve created or downloaded files in your Linux system, the next logical step is to view their contents. Whether it’s a README file, configuration file, or log file, the terminal offers several flexible and efficient ways to read them—without needing to open a GUI text editor.
In this section, you’ll learn the most useful bash shell commands for viewing text files directly from the command line.
🔍 Why Use CLI to View Files?
Using the terminal to view file contents is:
- ⚡ Faster than launching a GUI editor
- 🔧 Scriptable, which means you can automate file analysis
- 📂 Lightweight, especially on remote servers or WSL environments
- 🔒 Safe, since you’re not accidentally editing the file while reading it
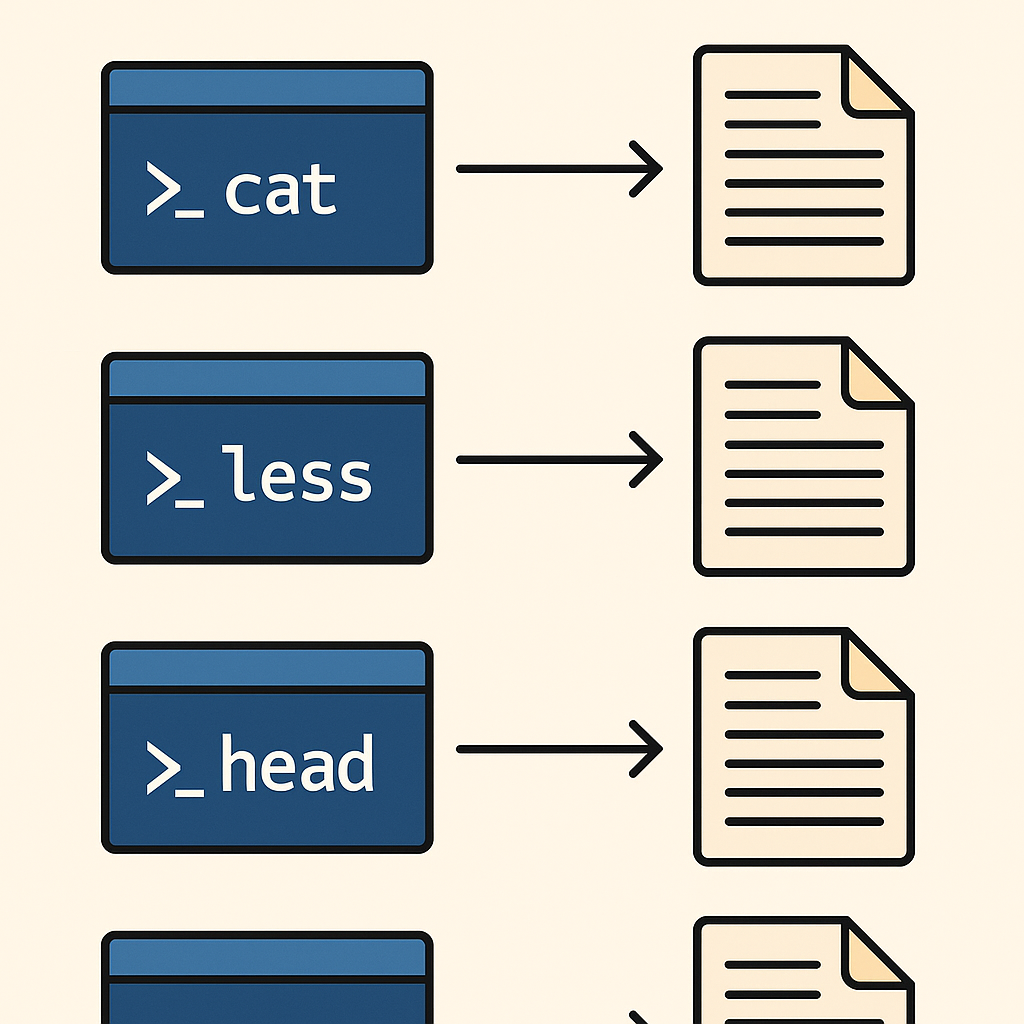
🔹 cat – Concatenate and Display File Contents
The cat command is the most basic way to print the entire contents of a file.
cat filename.txt
It’s best for short files. For long files, the output will scroll quickly past your screen.
You can also view multiple files at once:
cat intro.txt outro.txt
💡 Combine with > to create files:
cat > note.txt
# Type something and press Ctrl+D to save
🔹 less – The Smart Viewer (Recommended for Long Files)
Unlike cat, less allows you to scroll up and down through large files one page at a time.
less filename.log
Navigation Tips:
- Use
Spaceto go forward - Use
bto go back - Use
/keywordto search within the file - Press
qto quit
✅ less doesn’t load the entire file into memory—great for reading massive logs.
🔹 more – The Simpler Pager
more is an older, simpler version of less.
more filename.txt
It’s available on nearly every system, but lacks the advanced navigation features of less.
🔹 head – View the First Few Lines
If you only want to see the beginning of a file:
head filename.txt
By default, it shows the first 10 lines.
Customize line count:
head -n 20 filename.txt # First 20 lines
🔹 tail – View the Last Few Lines
To view the end of a file, use tail.
tail filename.txt
Great for viewing recent log entries.
Follow a file in real-time:
tail -f system.log
This is useful when monitoring a live log file during program execution.
🧪 Real-World Scenario: Watching Logs
Let’s say your web server is writing to a log file called access.log.
cd /var/log/nginx
tail -f access.log
You’ll now see new log entries appear live as users access your site—no need to refresh.
This is extremely useful for debugging and monitoring.
📋 Comparison Table: File Viewing Commands
| Command | Best For | Example |
|---|---|---|
cat | Short files | cat notes.txt |
less | Large files with navigation | less logs.txt |
more | Lightweight preview | more license.txt |
head | First few lines | head -n 5 output.txt |
tail | Last few lines | tail error.log |
tail -f | Real-time updates | tail -f /var/log/syslog |
⚠️ Common Mistakes
- Using
catfor large files
Can flood your terminal. Uselessinstead. - Forgetting to quit
lessormore
Pressqto exit. Many beginners get “stuck”. - Overwriting a file with
cat >unintentionally
Always double-check before using redirection.
🧠 Bonus Tip: Combine With grep for Search
Want to search for a specific keyword in a file?
grep "ERROR" server.log
Or combine with less for full control:
grep "ERROR" server.log | less
This gives you the best of both worlds—filtering + paging.
🎯 What You’ve Learned
You now know how to:
- Use
cat,less,more,head, andtailto read file contents - Monitor logs in real time with
tail -f - Search inside files with
/inlessorgrep - Choose the right tool depending on file size and task
These bash shell commands are indispensable for file inspection, troubleshooting, and daily Linux work.
👉 Next Up: Section 6 – Editing Files in the Terminal with Nano and Vim
✍️ Section 6: Editing Files in the Terminal with Nano and Vim
After learning how to view files using commands like cat, less, and tail, the next step is to edit those files directly from the terminal. This is especially important when you’re working on remote servers, Docker containers, or headless environments where no graphical text editor is available.
In this section, you’ll learn how to use two of the most popular bash shell commands for editing files: nano (beginner-friendly) and vim (powerful and fast, but with a learning curve).
🔧 Why Edit Files from the Terminal?
Editing files in the command-line has many advantages:
- 🧠 Low resource usage – no heavy GUI overhead
- ⚙️ Essential for DevOps and remote system administration
- 📂 Used in scripting, config files, logs, and version control
- 🧱 Often required in real-time server debugging and deployment tasks
🪶 nano – The Beginner-Friendly Editor
If you’re new to the terminal, start with nano.
nano filename.txt
Once opened, you’ll see the contents of the file and a list of shortcut keys at the bottom. Use your arrow keys to move the cursor.
✅ Basic Nano Commands:
| Action | Shortcut |
|---|---|
| Save | Ctrl + O |
| Exit | Ctrl + X |
| Cut Line | Ctrl + K |
| Paste Line | Ctrl + U |
| Search | Ctrl + W |
💡 You can also create a new file directly:
nano newfile.txt
If the file doesn’t exist, nano will create it.
⚡ vim – The Powerful, Efficient Editor
Vim is built for speed and precision. It’s a modal editor, meaning you switch between modes like insert, command, and visual.
vim filename.txt
You’ll start in command mode by default.
🔑 Basic Vim Workflow:
- Press
i→ Enter insert mode (to start typing) - Type your text
- Press
Esc→ Return to command mode - Type
:w→ Save - Type
:q→ Quit
Or:wq→ Save and quit
Or:q!→ Quit without saving
🧪 Use Case: Editing a Configuration File
Let’s say you need to edit your .bashrc to add an alias:
nano ~/.bashrc
Scroll to the bottom and add:
alias ll='ls -lah'
Then save (Ctrl + O) and exit (Ctrl + X).
Apply changes:
source ~/.bashrc
Done! Your alias is now live.
📋 Comparison Table: Nano vs Vim
| Feature | Nano | Vim |
|---|---|---|
| Ease of use | ⭐⭐⭐⭐☆ | ⭐☆☆☆☆ |
| Speed | ⭐⭐☆☆☆ | ⭐⭐⭐⭐⭐ |
| Learning curve | Low | High |
| Installed by default | ✅ | ✅ |
| Best for | Beginners | Power users & DevOps |
💡 Bonus Tip: Use EDITOR Environment Variable
If you’re writing a Git commit or working in tools like crontab, Linux may ask for your default terminal editor. You can set it like this:
export EDITOR=nano
# Or
export EDITOR=vim
Make it permanent by adding it to your .bashrc.
⚠️ Common Pitfalls
- Getting “stuck” in Vim
Always remember:ito insertEscto stop:wqto save and quit
- Forgetting to save in Nano before exit
Nano will prompt you if you forget, but double-check withCtrl + O. - Editing system files without sudo
Example:sudo nano /etc/hosts
🎯 What You’ve Learned
Now you can:
- Open and edit text files with
nano(user-friendly) orvim(advanced) - Save, quit, and search within both editors
- Modify important config files and create new ones from the shell
- Avoid common mistakes and choose the editor that suits your style
👉 Next Up: Section 7 – Searching and Filtering Text in the Terminal with Grep, Sed, and Awk
🔎 Section 7: Searching and Filtering Text in the Terminal with Grep, Sed, and Awk
As your Linux skills grow, you’ll start dealing with larger files, logs, and data outputs—often too big to scroll through manually. That’s where text processing tools come in.
The commands grep, sed, and awk are essential bash shell commands for anyone who wants to search, extract, and manipulate text directly from the terminal.
These tools are powerful, scriptable, and incredibly fast. Used together or individually, they allow you to automate everything from log filtering to CSV parsing and config rewriting.
🔍 grep – Search for Matching Text
The grep command searches for a specific pattern or keyword in a file.
grep "ERROR" logfile.txt
Useful options:
-i→ Ignore case-r→ Search recursively through folders-n→ Show line numbers--color→ Highlight matches
Example:
grep -in --color "warning" /var/log/syslog
💡 Combine with tail -f for real-time log monitoring:
tail -f /var/log/nginx/access.log | grep "404"
🪄 sed – Stream Editor for Substitution and Manipulation
sed is used for editing text in-place, without opening a text editor. Perfect for automation and batch updates.
Basic syntax:
sed 's/old/new/' file.txt
This replaces the first occurrence of “old” with “new” on each line.
Example: Replace all instances globally:
sed 's/http/https/g' urls.txt
Write changes to a new file:
sed 's/foo/bar/g' input.txt > output.txt
💡 Also great for deleting lines:
sed '/^$/d' file.txt       # Remove empty lines
sed '/DEBUG/d' logfile.txt # Remove lines with DEBUG
📊 awk – The Smartest CLI Parser
awk is a mini programming language for parsing and transforming structured text like CSV, TSV, or column-bashd output.
Basic syntax:
awk '{print $1}' file.txt
This prints the first column from each line (fields separated by space or tab).
Example: Print username from /etc/passwd:
awk -F: '{print $1}' /etc/passwd
With condition:
awk '$3 > 1000 {print $1}' /etc/passwd
This prints only users with UID > 1000.
🧪 Real-Life Scenarios
| Task | Command |
|---|---|
| Search for “error” in logs | grep -i error /var/log/syslog |
Find all .env files with a specific variable | grep -r "API_KEY" ~/projects |
| Replace tabs with spaces in a file | sed 's/\t/ /g' file.txt |
| Extract 3rd column from CSV | awk -F, '{print $3}' data.csv |
These commands are at the heart of many DevOps pipelines, log analyzers, and data cleanup scripts.
🧠 Summary of Text Processing Commands
| Command | Purpose | Example |
|---|---|---|
grep | Search | grep "ERROR" app.log |
sed | Replace or delete text | sed 's/foo/bar/g' |
awk | Extract fields | awk '{print $2}' |
⚠️ Common Mistakes
- Forgetting quotes in grep or sed patterns
- Correct:
grep "error" - Wrong:
grep error.log(could misinterpret)
- Correct:
- Confusing
awkcolumns due to space/tab mix- Use
-Fto set delimiters clearly:awk -F,for CSV
- Use
- Running sed in-place without
-i- Add
-ito apply changes directly:sed -i 's/localhost/127.0.0.1/g' config.ini
- Add
🎯 What You’ve Learned
Now you can:
- Use
grepto search through large files quickly - Use
sedto automate find-and-replace or remove lines - Use
awkto extract, filter, and format data
These bash shell commands are your ultimate allies for automating tasks, reading logs, transforming output, and making shell scripts smarter.
👉 Next Up: Section 8 – Monitoring System Resources Using Top, Ps, and Free
🖥️ Section 8: Monitoring System Resources Using Top, Ps, and Free
Whether you’re running a lightweight laptop or managing a cloud server, one of the most important tasks in system administration is monitoring resource usage. How much memory is being used? Which processes are hogging the CPU? Is your system close to running out of swap space?
In this section, we’ll walk through three essential bash shell commands that let you monitor your system in real time: top, ps, and free. These tools are built into virtually every Linux distribution and are must-know for performance troubleshooting, server diagnostics, and basic system health checks.
🔧 Why Monitor System Resources via CLI?
Graphical tools are great, but they often consume extra resources. CLI tools give you fast, scriptable, low-overhead access to your system’s live status.
You’ll use these commands when:
- Your system feels slow and you need to find out why
- You want to monitor CPU, RAM, or swap usage in real time
- You’re managing a headless server (no GUI)
- You’re writing shell scripts for resource-bashd alerts
✅ Want to go deeper into terminal customization and performance optimization?
Check out our guide on Linux Shell Customization 2025 to level up your workflow.
📊 top – Real-Time Resource Monitor
top provides a live, interactive view of CPU usage, memory consumption, process IDs (PIDs), and more.
top
Once running, use keys to interact:
q– Quitk– Kill a process (enter PID)P– Sort by CPU usageM– Sort by memory usage
Sample Output:
%CPU   %MEM   PID   USER   COMMAND
12.3   20.4  1123   john   firefox
💡 Use htop for a more colorful and user-friendly version (requires installation):
sudo apt install htop
🧠 ps – Snapshot of Running Processes
ps (process status) is used to display currently running processes in snapshot form.
Basic usage:
ps aux
Common Flags:
a→ Show all usersu→ Show user/ownerx→ Include background services
Search for a specific process:
ps aux | grep ssh
Or display a tree view:
ps -ef --forest
Useful in shell scripting to track or kill processes programmatically.
💾 free – Check Memory and Swap Usage
To see how much RAM and swap memory is in use:
free -h
Output includes:
- total
- used
- free
- available memory
Flags:
-h→ Human-readable (MB/GB)-s 2→ Refresh every 2 seconds
Example:
free -h -s 5
💡 Combine with watch to create live updates:
watch free -h
🧪 Real-World Scenario: Investigating High Memory Usage
Let’s say your server is lagging.
- Run:
free -h→ Shows 95% memory used - Launch:
top→ Sort by memory usage (M), identify the top culprit - Kill the process (if necessary):
kill -9 1234 # where 1234 is the PID
📋 Summary Table: Monitoring Tools
| Command | Purpose | Use Case |
|---|---|---|
top | Live CPU/memory/process monitor | Real-time debugging |
ps | Process snapshot | Find running services |
free | RAM and swap info | Check memory bottlenecks |
⚠️ Common Pitfalls
- Using
pswithout full flags
→ You might miss background processes. Always useaux. - Killing wrong processes from
top
→ Always double-check the PID before hittingk. - Forgetting
-hinfree
→ Outputs in KB by default—hard to read.
🎯 What You’ve Learned
You now know how to:
- Monitor system load using
toporhtop - Take a snapshot of running processes with
ps aux - Check memory and swap availability using
free -h - Take action using
kill,watch, and other helpers
These bash shell commands are vital for any system administrator, power user, or Linux enthusiast looking to stay in control of system performance.
👉 Next Up: Section 9 – Managing Permissions and Ownership with Chmod and Chown
🔐 Section 9: Managing Permissions and Ownership with Chmod and Chown
In Linux, every file and directory has permissions that define who can read, write, or execute it. Managing these permissions properly is critical for system security, privacy, and preventing accidental modification.
This section covers three of the most important bash shell commands for permission and ownership control: chmod, chown, and umask.
🔧 Why Permissions Matter
Linux is a multi-user system. Even on a single-user laptop, system services, packages, and processes operate under different users and groups. Poorly managed permissions can result in:
- Unauthorized users accessing sensitive files
- System crashes due to misconfigured scripts
- Security vulnerabilities in web servers and public directories
Understanding permission commands is vital whether you’re a casual user or deploying production servers.
🔍 Understanding Linux Permissions at a Glance
Run:
ls -l
You’ll see something like:
-rw-r--r-- 1 user group 1234 Jun 16 notes.txt
Breakdown of the permission string:
-= File (ordfor directory)rw-= Owner: read & writer--= Group: read onlyr--= Others: read only
🛠️ chmod – Change File Permissions
To change permissions, use chmod.
Symbolic Mode:
chmod u+x script.sh
Adds execute permission (+x) to user (u).
Other symbols:
g= groupo= othersa= all
Remove permissions:
chmod o-w file.txt # remove write from others
Numeric (Octal) Mode:
Each permission level has a number:
r= 4w= 2x= 1
So:
chmod 755→ rwxr-xr-xchmod 644→ rw-r–r–
Example:
chmod 700 private.sh
→ Only owner can read/write/execute.
👥 chown – Change File Ownership
Change the user or group owner of a file or directory.
chown username:groupname file.txt
Example:
sudo chown www-data:www-data /var/www/html/index.html
You can also recursively change ownership for directories:
sudo chown -R youruser:yourgroup ~/projects/
🧰 umask – Default Permission Settings
When new files are created, umask defines their default permissions.
Check current value:
umask
To change it temporarily:
umask 022
💡 A umask of 022 results in new files being created with 644 (rw-r--r--) and directories with 755.
Make permanent by adding to .bashrc or .zshrc.
🧪 Real-Life Example: Making a Script Executable and Secure
- Create the script:
touch deploy.sh
- Give the owner full control:
chmod 700 deploy.sh
- Make sure you own it:
chown $USER:$USER deploy.sh
Now it’s private, executable, and safe.
📋 Summary Table: Permission Tools
| Command | Purpose | Example |
|---|---|---|
chmod | Change permissions | chmod 755 script.sh |
chown | Change ownership | sudo chown user:group file |
umask | Set default permissions | umask 022 |
⚠️ Common Mistakes to Avoid
- Using
chmod 777carelessly
It gives full access to everyone—including malicious users. - Not using
sudowithchown
Without proper privileges,chownwill fail silently. - Forgetting to set execute bit on scripts
Scripts won’t run without+x. - Editing system files with wrong owner/permission
Could cause boot errors or web server failures.
🎯 What You’ve Learned
You now know how to:
- Read and interpret Linux file permissions
- Use
chmod(symbolic or numeric) to change access rights - Assign file and directory ownership using
chown - Set default permissions with
umask
These bash shell commands are critical to both security and stability in any Linux environment.
👉 Next Up: Section 10 – Networking Essentials from the Terminal (Ping, Curl, and IP)
🌐 Section 10: Networking Essentials from the Terminal with Ping, Curl, and IP
In a connected world, being able to test and troubleshoot network connections from the command line is one of the most important skills for any Linux user or system administrator. Luckily, Linux offers several bash shell commands that make this possible—without any need for a GUI.
In this section, you’ll learn how to use ping, curl, wget, and ip to diagnose network issues, check connectivity, and test APIs directly from the terminal.
🧠 Why CLI-Bashd Networking Tools Matter
GUI tools may look nice, but they can’t beat the speed and flexibility of the command line—especially when:
- You’re SSH’d into a remote server
- You want to test a script or URL endpoint
- You need to check DNS resolution or IP conflicts
- You’re troubleshooting under time pressure
💡 Want to go further with terminal productivity and custom networking scripts?
Check out our internal guide:
🔗 Linux Shell Customization 2025
And for deep packet inspection or port scanning, you might also consider tools like nmap and Wireshark.
📶 ping – Test Network Reachability
The ping command checks whether a host (domain or IP address) is reachable.
ping google.com
Sample output:
64 bytes from 142.250.207.206: icmp_seq=1 ttl=115 time=12.4 ms
Use -c to limit the number of packets:
ping -c 4 an4t.com
💡 Great for quickly checking DNS issues or broken internet.
🌍 curl – Interact with Web Services (GET/POST)
curl is your go-to tool for testing web APIs, downloading files, and simulating HTTP requests.
Basic GET request:
curl https://api.github.com
Download a file:
curl -O https://example.com/file.zip
POST with JSON:
curl -X POST -H "Content-Type: application/json" \
  -d '{"name":"chatgpt"}' https://httpbin.org/post
Use -I to get headers only:
curl -I https://an4t.com
🔗 Need more? Refer to the official Curl Manual
⬇️ wget – Download Files from the Internet
While curl is flexible, wget is purpose-built for file downloads.
wget https://example.com/image.jpg
Download recursively:
wget -r -np -k https://example.com/docs/
This is especially useful when scraping static websites or downloading entire documentation trees.
🔎 ip – Network Interface and Routing Info
The ip command replaces older tools like ifconfig.
ip a
Shows all network interfaces and their IPs.
Check default route:
ip route
Bring down interface (as root):
sudo ip link set eth0 down
Re-enable it:
sudo ip link set eth0 up
Need to troubleshoot routing issues? Combine with:
traceroute google.com
🧪 Use Case: Testing a Webhook from CLI
Let’s say your webhook server is running locally on port 8080.
curl -X POST -d "user=test" http://localhost:8080/hook
Or test if external webhook is up:
curl -I https://your-api.com/hook
Get full response with -v (verbose):
curl -v https://your-api.com/hook
📋 Networking Command Comparison
| Command | Purpose | Example |
|---|---|---|
ping | Test connection | ping -c 3 google.com |
curl | HTTP request & API test | curl -I https://example.com |
wget | File download | wget https://example.com/file |
ip | Network info | ip a |
⚠️ Common Mistakes to Avoid
- Using
ifconfigon modern distros
Most have deprecated it—useipinstead. - Forgetting to quote JSON in curl
Always wrap the body in single quotes to avoid shell issues. - Not using
-Ifor headers only
Without it,curlmay download full web pages when you just need a response status. - Firewall issues blocking ping
Some servers block ICMP requests; test with other tools likecurlortelnetfor port checking.
🎯 What You’ve Learned
You now know how to:
- Check connectivity using
ping - Make web requests with
curl - Download files with
wget - Inspect IP addresses and routing with
ip
These bash shell commands form the foundation of Linux networking troubleshooting and automation.
👉 Next Up: Section 11 – Archiving and Compressing Files with Tar and Gzip
📦 Section 11: Archiving and Compressing Files with Tar and Gzip
In Linux, archiving and compressing files is a common task—whether you’re backing up projects, packaging code for deployment, or reducing file sizes for faster transfer.
The most widely used bash shell commands for these tasks are tar, gzip, and zip.
These tools are fast, built-in, and scriptable—ideal for system admins, developers, and even regular users.
🎒 Why Archive and Compress from the Command Line?
- 🔄 Automate backups
- 📁 Combine multiple files into one
.tararchive - 📉 Shrink large log files to save disk space
- 💻 Transfer packages over SSH or FTP more efficiently
Unlike GUI tools, these commands can be used remotely, embedded in cron jobs, or chained into larger automation scripts.
📦 tar – Archive Multiple Files into a Single File
The tar (tape archive) command is used to bundle files and directories into one file—without compression by default.
tar -cvf archive.tar folder/
Flags:
c→ Create new archivev→ Verbose (list files as archived)f→ File name
Extract a .tar file:
tar -xvf archive.tar
Extract to a specific directory:
tar -xvf archive.tar -C /path/to/target/
💡 Add z to compress with gzip:
tar -czvf archive.tar.gz folder/
📉 gzip – Compress Single Files
Use gzip to compress individual files using the .gz format.
gzip logfile.log
This will replace logfile.log with logfile.log.gz.
Decompress:
gunzip logfile.log.gz
💡 To keep the original file, use:
gzip -k logfile.log
🔃 zip and unzip – Cross-Platform Compression
If you’re sharing with Windows users, zip is often more compatible.
Compress:
zip archive.zip file1 file2 folder/
Extract:
unzip archive.zip
Use -r to zip directories:
zip -r project.zip my_project/
🧪 Real-World Use Case: Backing Up a Web Project
cd ~/projects
tar -czvf webapp_backup_2025.tar.gz my_web_app/
This creates a compressed .tar.gz file containing your entire project—ready to send, upload, or store.
Later, you can restore it:
tar -xzvf webapp_backup_2025.tar.gz
📋 Command Comparison Table
| Command | Use Case | Compression | Example |
|---|---|---|---|
tar | Bundle files | Optional | tar -cvf archive.tar dir/ |
tar + gzip | Archive + compress | Yes | tar -czvf archive.tar.gz dir/ |
gzip | Compress one file | Yes | gzip logfile.log |
zip | Compress multiple (Windows-friendly) | Yes | zip -r files.zip folder/ |
unzip | Extract zip files | — | unzip archive.zip |
⚠️ Common Mistakes to Avoid
- Forgetting
-fintar
Without it,tarfails because it doesn’t know the output filename. - Mixing up
gzipandtar.gzgzipcompresses only one file, not a directory. - Overwriting files on extract
Extracting into the wrong folder can overwrite existing data. Use-Cto control target path. - Using
zipwithout-r
Compressing folders without-rwon’t include subdirectories.
🎯 What You’ve Learned
Now you can:
- Archive files using
tar - Compress and decompress files using
gzip,gunzip, andzip - Combine both for efficient
.tar.gzbackups - Avoid overwriting or misplacing extracted files
These bash shell commands are essential for any file management workflow, especially when scripting deployments, automating backups, or preparing packages for remote transfer.
👉 Next Up: Section 12 – Redirection and Piping for Automation in the Shell
🔁 Section 12: Redirection and Piping for Automation in the Shell
In Linux, shell redirection and piping are what transform simple commands into powerful workflows.
Instead of manually opening files or copying results, you can connect commands together, redirect output to files, or chain tools to filter, search, and automate nearly anything.
These concepts are foundational to shell scripting, DevOps automation, and Linux productivity.
🔧 What Is Redirection?
Redirection is about sending input or output from one place to another—either to/from a file or between commands.
▶️ Output Redirection
> – Overwrite Output to a File
echo "Hello World" > hello.txt
Creates hello.txt or replaces it if it exists.
>> – Append Output to a File
echo "New Line" >> hello.txt
Adds to the end of hello.txt instead of overwriting.
◀️ Input Redirection
< – Feed Input from a File
wc -l < hello.txt
Counts lines from hello.txt, using it as standard input.
🧪 Example: Logging Script Output
Instead of printing to terminal, log your script’s output:
./deploy.sh > deploy.log
To log both standard output and errors:
./deploy.sh > deploy.log 2>&1
This is essential when running cron jobs or background scripts.
🔗 What Is a Pipe (|)?
The pipe operator (|) connects the output of one command directly to the input of another.
ls -l | grep ".txt"
This sends the file list into grep, filtering only .txt files.
🔁 Common Pipe Use Cases
Count .conf Files in /etc
ls /etc | grep ".conf" | wc -l
Show Processes Using the Most Memory
ps aux | sort -nk 4 | tail -n 10
Monitor Log for Errors in Real-Time
tail -f /var/log/syslog | grep "error"
⚙️ Combine Pipes + Redirection
You can pipe and redirect together for even more automation:
df -h | grep "/dev/sda" > disk_report.txt
Now you have a disk usage summary saved in a file, filtered and formatted.
📋 Summary: Redirection & Pipe Symbols
| Symbol | Purpose | Example |
|---|---|---|
> | Overwrite output to file | echo hi > log.txt |
>> | Append output | echo hi >> log.txt |
< | Use file as input | cat < file.txt |
| ` | ` | Pipe output to another command |
2>&1 | Redirect error output | command > out.log 2>&1 |
🧠 Real-World Workflow: Backup + Compress + Log
tar -czf backup.tar.gz my_folder | tee backup.log
With tee, you can both log to a file and see output in real-time.
Or make a script:
#!/bin/bash
df -h > disk.txt
du -sh ~/Downloads >> disk.txt
Automate system status checks and store reports daily with cron.
⚠️ Common Mistakes to Avoid
- Forgetting to quote file names with spaces:
echo "hello" > "My File.txt" - Using
>when you meant>>:
→>overwrites! Always double-check when logging. - Not handling errors:
→ Use2>or2>&1to catch failures in automation. - Overcomplicating pipelines:
→ Keep pipes clean and readable. Use one per line if needed.
🎯 What You’ve Learned
You now understand how to:
- Redirect input and output using
>,>>, and< - Chain commands together with
| - Save logs, filter outputs, and build powerful one-liners
- Combine these concepts to automate tasks and build scripts
These bash shell commands form the core of nearly every shell script and automation workflow.
👉 You’re Ready: Turn These Commands into Real Automation Scripts
Combine what you’ve learned with tools like cron, bash, and systemd to build full workflows.
Also revisit our Linux Shell Customization 2025 for ways to create aliases, color-coded prompts, and advanced shortcuts that build on these commands.
📚 Bash Commands – Frequently Asked Questions (FAQ)
1. What are Bash commands?
Bash commands are instructions typed into the terminal in a Linux environment that control your system, such as managing files, running programs, monitoring performance, and automating tasks.
2. Are Bash commands the same as Linux commands?
Mostly yes. When people say “Linux commands,” they usually mean Bash commands, since Bash is the default shell for most Linux distributions. Other shells (like Zsh or Fish) have different features.
3. How do I open the Bash terminal on Linux?
You can press Ctrl + Alt + T in most Linux environments. On WSL (Windows Subsystem for Linux), just open your installed Linux distribution from the Start menu.
4. How do I create and delete files using Bash?
Use touch filename.txt to create a file, and rm filename.txt to delete it. To remove folders, use rm -r foldername.
5. How can I move around directories using Bash commands?
Use cd foldername to move into a folder, cd .. to go up one level, and pwd to show your current directory.
6. How do I check system resource usage in Bash?
Use top for a live overview, ps aux to list processes, and free -h to check memory usage. These are essential Bash commands for system monitoring.
7. What is the difference between > and >> in Bash?
The > symbol overwrites the output file, while >> appends to it. Use >> when you want to keep previous content.
8. How can I search for specific text in a file using Bash?
Use the grep command:
grep "keyword" filename.txt
For more complex processing, use sed or awk.
9. How do I make a script file executable in Bash?
Run:
chmod +x script.sh
Then execute it with ./script.sh.
10. What’s the safest way to delete files in Bash?
Use rm -i to confirm each deletion, or create a trash folder and move files there using mv. Avoid rm -rf unless you’re absolutely sure.
11. Can Bash commands be used to automate tasks?
Absolutely. Bash commands are often combined into scripts (.sh files) and scheduled with tools like cron for full automation workflows.
12. Where can I learn more about Bash customization and shortcuts?
Check out our guide:
👉 Linux Shell Customization 2025
It covers aliases, PS1 prompt tweaks, auto-completion, and productivity tips.